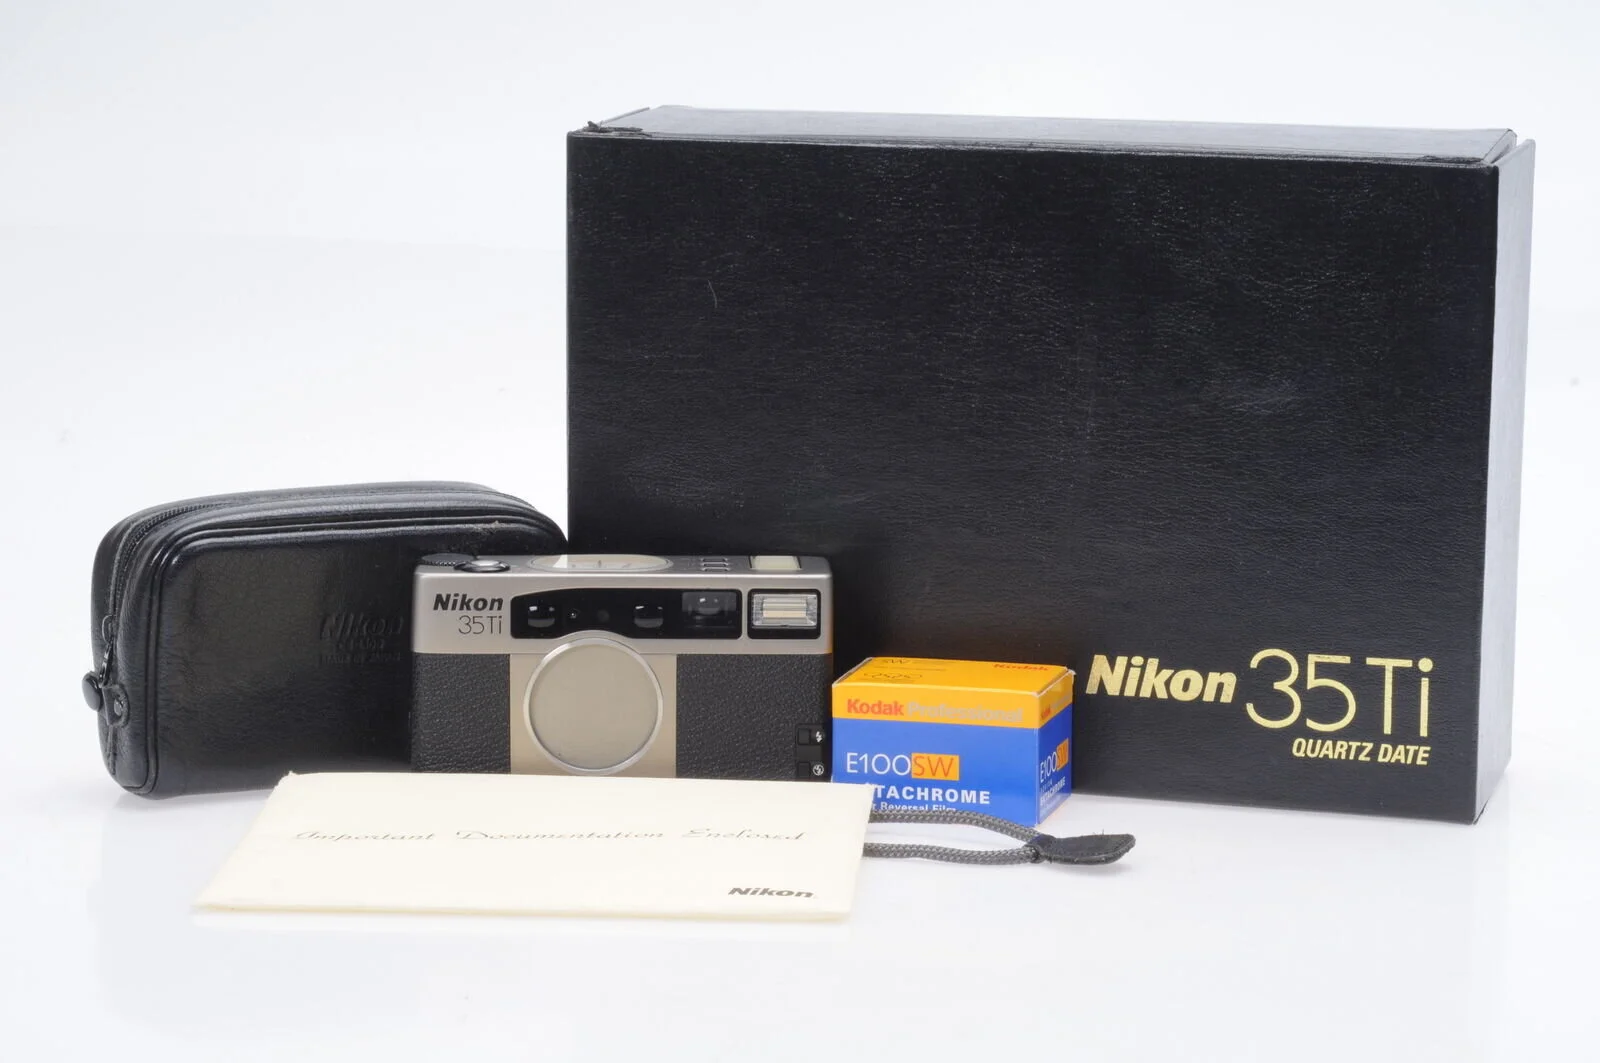
New Acquisition: Nikon 35Ti
The Nikon 35Ti (and, by extension, the 28Ti - depending on what focal length you want) has always been an extremely interesting and desirable camera for me. I’ve always wanted one premium compact point and shoot in my collection….
There isn’t much to say here - yet. A full review will be forthcoming once I’ve, you know, actually used the camera.
The Nikon 35Ti (and, by extension, the 28Ti - depending on what focal length you want) has always been an extremely interesting and desirable camera for me. I’ve always wanted one premium compact point and shoot in my collection (“collection” meaning “things that look good on a shelf AND that I use”).
I had a Leica Minilux once upon a time, but the viewfinder was utterly abysmal and the camera was, overall, not for me - at least not at that price.
I’ve had a number of others in my possession, usually cameras that I fixed and immediately sold: Contax T2, TVS, TVS II, Konica Hexar AF, and the more usual suspects like Rollei 35, Olympus XA, Olympus Mju, etc. I was most impressed by the Contax T2 and Hexar AF…. with a serious case of seller’s remorse on the T2 all these years later where it’s now double the price (at least).
For the past couple years, I’ve lusted after a Minolta TC-1 or a Nikon 35Ti.
Lo and behold, I came across an excellent condition 35Ti with all original packaging (even including the roll of Ektachrome that was sold with the camera).
From top (clockwise): 1) Number of shots taken, 2) Aperture - either chosen by you in A priority or by the camera in P, 3) Exposure compensation, 4) Focus distance
So far, I am a happy camper. The top panel dials receive mixed reactions - personally, I love them. For the same reason I like the top LCD panel on the Nikon Z cameras, I can walk around with all basic parameters set without ever bringing the camera to my eye. And the viewfinder doesn’t get cluttered with info, just the shutter speed.
It’s now loaded with a roll of Fujifilm Acros 100 II…. so I’ll check back soon.
Update: Sorry for the Lack of Posts
I realize posts have been sparse the last few months. There has been a lot going on in my personal life, and additionally I have been directing all my focus on writing and finishing several scripts.
I have a number of posts in the works - many at least half written - including a review of the Nikon Z 24-200mm f/4-6.3……
I realize posts have been sparse the last few months. There has been a lot going on in my personal life, and additionally I have been directing all my focus on writing and finishing several scripts.
One of several current screenplay projects
I have a number of posts in the works - many at least half written - including a review of the Nikon Z 24-200mm f/4-6.3, which I received back in August thanks to NPS Priority Delivery. Short and sweet thoughts: an excellent lens that feels like a successor to the Nikkor 24-120/4 with superior image quality and more range. In fact, I sold my 24-70/4 S in favor of the 24-200.
I also recently purchased the DJI Mavic Pro 2, so expect some content regarding that (it is arriving today, so I haven’t even used it yet).
Thanks for reading and stay tuned.
To Filter or Not: UV, ND, Polarizing, and Other
One of the longest running debates on the Internet is the use of filtration – specifically UV (ultraviolet) filters. Some see UV filters as instruments of protection (of their lens) without any real consequences; others see them as sacrilegious pieces of inferior glass that compromise image quality. So, let’s get into it a little bit because there are merits to both camps; though I feel like it is almost universally agreed that any filters that come in a camera or lens bundle should best be left unopened and away from your lenses.
Let’s be clear upfront: there will be no definitive answers here, nor any pixel-peeping sample photos of shots with and without filters. This is more about the types of filters and reasons to use them (or perhaps not). As with many of these posts, this is intended to be more informational/educational (with some opinions thrown in) than a simple “here’s the best and only way to do this.”
Finally, I’ll close with some recommendations of very good and excellent filters that I personally use.
One of the longest running debates on the Internet is the use of filtration – specifically UV (ultraviolet) filters. Some see UV filters as instruments of protection (of their lens) without any real consequences; others see them as sacrilegious pieces of inferior glass that compromise image quality. So, let’s get into it a little bit because there are merits to both camps; though I feel like it is almost universally agreed that any filters that come in a camera or lens bundle should best be left unopened and away from your lenses.
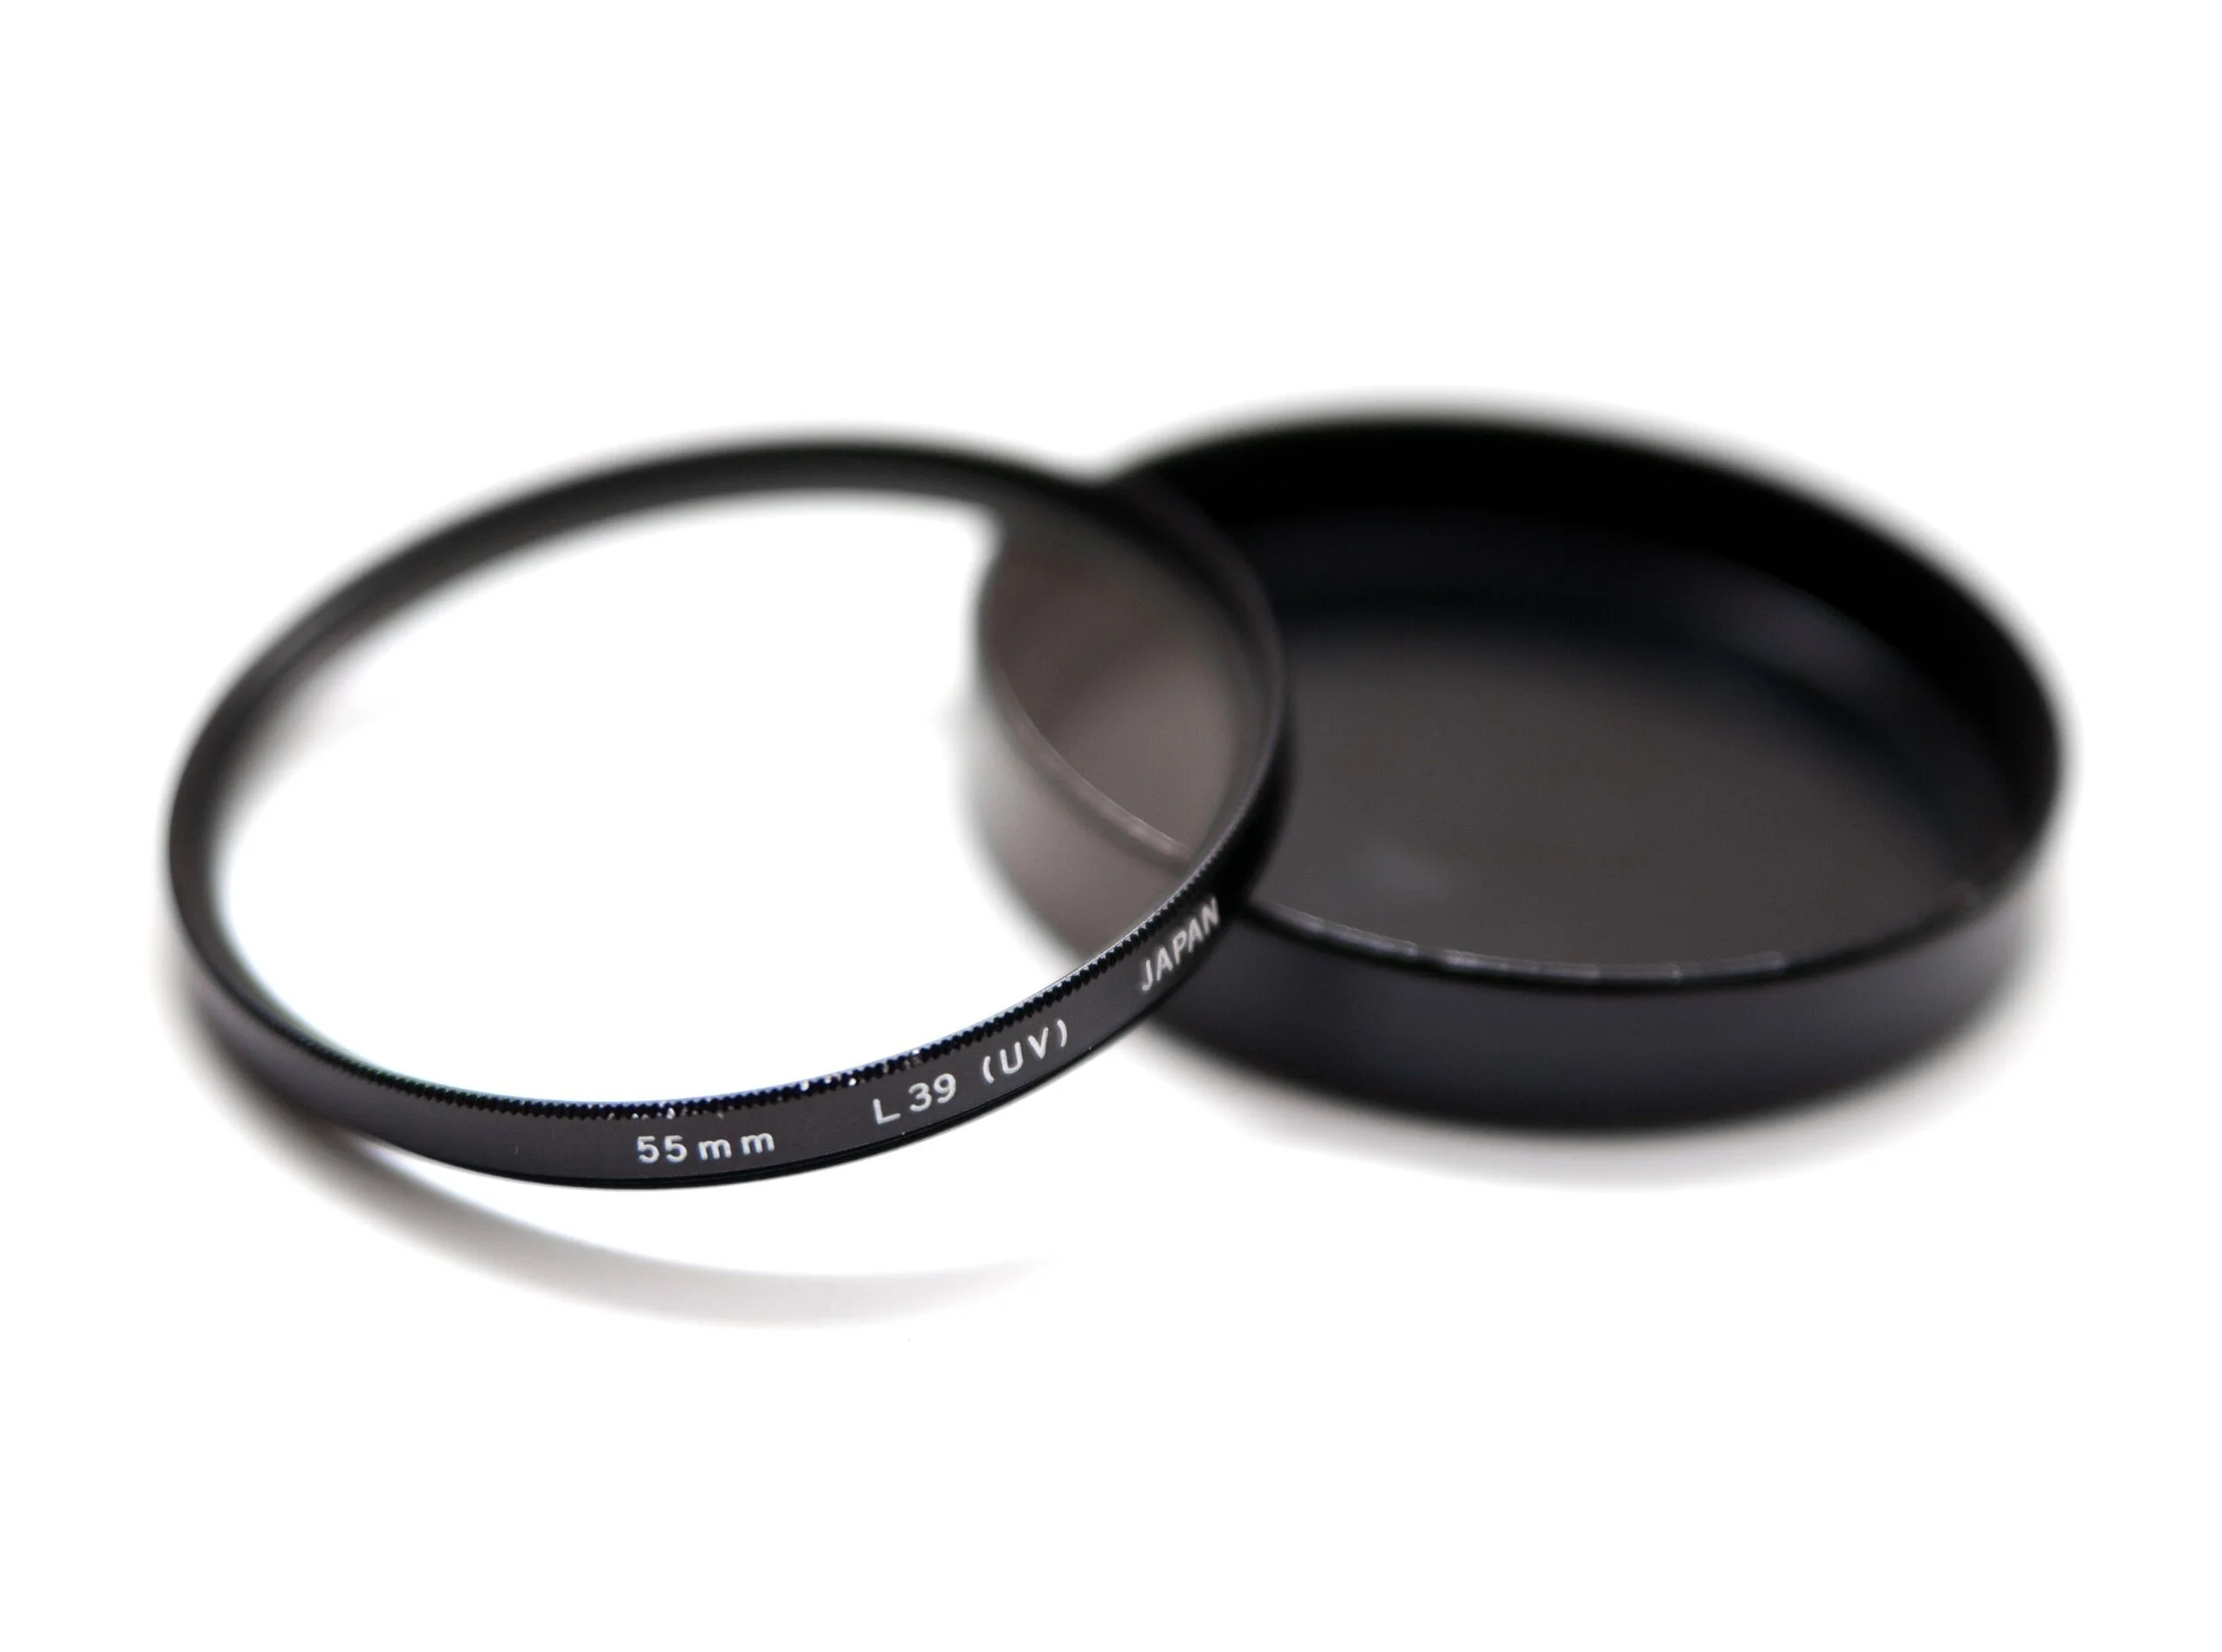
L39 UV Filter
Wikipedia Creative Commons License
What the hell is a UV filter? Good question. There’s a reason these filters aren’t just called “protection filters” or some such, even though that’s just about all they do (these days). First of all, we should denote the difference between a UV Filter and a UV Pass Filter because sometimes the former is used to describe the latter: a “UV filter” is nothing more than glass that filters/eliminates/blocks ultraviolet light from passing through into the lens and subsequently onto the sensor (or film). A “UV Pass Filter” is quite the opposite; it allows types of ultraviolet light through while blocking others. We’re talking specifically about UV Filters only.
Light presents itself in all manner of ways, many of which we cannot see. Ultraviolet light is one of those types that we cannot see – in fact, visible light is generally defined as landing somewhere between 400 and 700 nanometers. This happens to be the spectrum between ultraviolet (roughly 10-400 nm) and infrared (about 700nm up to something like 1400nm for near-infrared; other types have longer wavelengths). Below UV light we have x-rays, which can be as small as 0.01nm (aka 1 picometer), and gamma rays; above infrared we have microwaves and radio waves, among many others.
At any rate, there are many different types of light, but also many different types of ultraviolet light. So, in the olden days, film was particularly sensitive to ultraviolet light; most modern films fair just fine without filtration, though depending on the environment, color film can fall victim to hazing and overexposure in the blue layer (the blue layer is sensitive not only to blue light but also UV light). Most filters from the film days would filter out a specific threshold of light; an L39 UV filter (as seen above) was common among brands – its name indicating that it filtered out UV light below 390nm.
What about digital cameras? These days, many UV filters are nothing more than clear pieces of glass with some coatings – they don’t actually filter any light. Modern digital sensors now have UV (and IR) filtration in front of the sensor. This wasn’t always the case – many video cameras required the use of IR cut filters for a while, as did cameras like the Leica M8. Some people will actually have these filter stacks removed or replaced to allow their camera to capture a greater (or different) spectrum of light; I have a 720nm IR converted Sony a6000. Conversions can range from UV (to filter everything except ultraviolet light), 720nm IR (the most popular, as it makes for a nice balance of beautiful color photos as well as black and white), 590nm IR (best for color only), 850nm IR (best for b&w only), and even full-spectrum which allows the sensor to collect UV, visible, and IR light, though this type requires the use of lens-based filters to switch between whatever light you do/do not want to capture. Kolari Vision is famous for these modifications.
Long story short, unless you have an older digital camera that lacks filtration or you have a modified camera, a UV filter will not provide any image quality benefits. If you choose to use one, you’re using it as protection for your lens.
What are the downsides of filters? Well, there are many possible issues, with possibility nearing certainty if you use a cheap, poorly made filter. Issues can range from transmission loss (this is inevitable technically, but bad filters transmit even less), veiling flare, color cast, ghosting, decreased acuity, and/or vignetting. Many of these can become quickly apparent when used with wide angle lenses.
General Interference with optics. This can be due to a huge variety of reasons and the effects can manifest themselves in just as many different ways (some are described as you read on). But, to describe an example as simply as possible: consider a lens like the Nikkor AF-S 14-24/2.8G, or Tamron SP 15-30/2.8 G2, or Sigma 14/1.8; all of these are fast, wide-angle lenses with bulbous, convex front element. Now, think about putting a flat piece of glass over that (which you have to attach to lenses like these with a large 150mm square fixture due to that front element). It might change some things, right?* One of which is the way light hits and enters the front element (angle of incidence), of course altering the path of the light as it travels to the sensor in the process. In effect, you are changing the optical formula of the lens.
*Wide angle lenses are particularly susceptible to this – not just because of their large front elements and gargantuan filter holders, but also because they’re collecting light from such a huge field of view (and therefore from an absurd number of angles). This is precisely why a 14mm lens at f/2.8 only requires a pupil diameter of 5mm, whereas a 100mm lens at f/2.8 needs a 35.7mm pupil – they both gather the same amount of light, but the 100mm needs a much larger opening because it gathers light from a significantly smaller area.
Light loss. All glass has a certain level of transmittance* – light is reflected, scattered, and absorbed as it passes through glass. This is why we have both T-stops and F-stops and they are never the same, though the best lenses manage to get very close. Lens and filter manufacturers try to achieve transmission as near to 100% as possible through the use of specialized coatings and glass elements, but a true 100% transmission is purely theoretical.
*“Transmittance” and “transmission” are not the same. Transmission is the amount of light that passes through a material (glass in our case) – often expressed simply as a percentage. Transmittance is a measurement of the amount of light that the glass reflects, absorbs, or disperses. Ergo, transmittance is essentially the inverse of transmission; and thus, the higher the transmission, the lower the transmittance (and vice versa).
Ghosting. Filters can also cause light to bounce around internally in ways that it certainly isn’t meant to. For example, light entering the lens can bounce from the sensor, back off the rear of the filter, then once again back into camera – this can rear its head as ghosting due to the secondary “ghost” image it produces on the opposite side of the optical axis. This is particularly noticeable at night and/or wide open and can even happen without a filter attached at all if there are flaws in the lens’ optics. I learned the latter the hard way years ago when shooting a show with what was obviously a misaligned Sigma 18-35/1.8 – ghost images appeared in a handful of shots, many during the daytime and a few at night; some daytime shots had matte-box ND filters attached and night shots had no filtration at all yet still produced ghost images.
Acuity/Resolution Degradation. Any time you place a piece of glass in front of a lens, you run the risk of degrading the peak image quality (in this case, pixel acuity) that the lens is capable of achieving. This effect is more noticeable as you climb the ladder of sensor technology; what may appear to have no ill-effects on a 12MP sensor with an AA filter may well prove to be terrible on a 47MP AA-less camera. In the days of film, a decent filter would likely not noticeably degrade IQ – lenses weren’t as good, 35mm film resolved less detail than sensors of today, and grain would typically mask minor optical deficiencies. Plus, even UV filters actually had measurable benefits on film.
Color Cast/Vignetting. These are relatively simple to understand. There are a couple reasons a filter may introduce color cast:
1) If a filter is not spectrally neutral, it will have some sort of effect on the colors – fairly obvious.
2) Depending on the design of the lens and the filter being used, the optical formula of the lens may be compromised to the extent that you see the effects. Filters can imperil the telecentricity of the lens and therefore undermining its zero angle of incidence*; this in turn causes rays of light to strike the sensor at an angle non-parallel to the optical axis. The upshot of this is the potential for color crosstalk as the light interacts with the color-filter array.
*A lens with a zero angle of incident is purely a theoretical perfectly telecentric lens. I doubt any such lens truly exists. Lenses will have a non-zero angle of incidence by their nature, however this doesn’t change the aforementioned interactions.
3) When using an ND filter, there is a decreased amount of visible light passing into the lens, but infrared light is unaffected. Because of this, the ratio of infrared to visual light increases and can induce color casts.
A lot of side-by-side tests of filters – and this is certainly not exclusive to UV filters, in fact ND filters may be the worst offender here – will show how much a non-spectrally neutral filter can shift the color balance of the image. Obviously, this doesn’t pertain to filters whose intended purpose is to do that exactly that. Vignetting is less of an issue here as it is one of the least worrisome of optical deficiencies, at least in my opinion. However, we really don’t want a filter to introduce additional vignetting on top of what the lens inevitably already exhibits. This is mostly an issue with wider angle lenses and/or thick filters. My suggestion is to always get the thinnest filter – Formatt Hitech, for example, calls these “Superslim.” Step up rings to use a larger size filter than your lens thread size is another option – this also allows you to buy fewer filters but still use them across multiple lenses.
So should you use a UV filter? I don’t know. Up to you. Personally, I use them some of the time and not at all most of the time. I certainly don’t use them in any type of controlled environment such as product, portraiture, etc. I will use them in more volatile environments – dusty, sandy, otherwise dirty, anything where there’s a good chance of abrasive particles/materials hitting the front element. I’ve shot in machine shops where small pieces of wood/metal/sparks are flying everywhere and I’ll definitely have one on in that situation. As for general protection? Meh. The front element of a lens is much more durable than most people think and modern repellent coatings are quite good at making minor dust, rain, snow, etc. easy to clean. I find that a lens hood and of course the cap are more than enough to protect from accidental bumps or dings.
Filters other than UV. Okay, so let’s hop in to the other types of filters – at least a few of them. There are tons of types of filters (and subvariants within those types) and I won’t cover them all. Pretty much every downside covered above is equally applicable to non-UV filters, though some of those effects (e.g. light loss in the case of neutral density filters) are the very purpose of the filter. So, the big ones:
Neutral Density (ND) Filters
These are filters that cut the amount of light that enters the lens by an order of a specific magnitude – an ND 1.8 (aka ND64) filter cuts light by six stops, for example. Ideally, these filters do this with a neutral transmission, meaning they cut the amount of light but do not affect the color, tint, white balance, etc. In practice, this is often not the case, especially with cheaper filters. A bit of a color cast can be dealt with and is not the end of the world in most cases, as long as the cast is uniform across the frame, which it ought to be with a standard ND filter.
Water smoothing effect of a lower shutter speed
Wikimedia Commons
These filters are usually used to lower the exposure enough to shoot at a wider aperture in bright light or to shoot at very slow shutter speeds. An ND64 (six stops) filter is the difference between a 1/60th second exposure and a 1 second exposure; or the difference between 1 second and 1 minute. In the latter, you may get a small amount of motion blur from that one second exposure, but a full minute will give you a lot more. Photos of waterfalls or ocean waves that have a smooth, silky appearance are examples of long exposure photography likely taken with an ND filter. Without the filter, these photos would have been grossly overexposed.
There are also variable ND filters, where the “darkness” of the filter changes as you turn the filter ring, and graduated ND filters, where the filter fades with a gradient from lighter to dark (usually used to darken a sky while not affecting the lower portion of the image). Uniformity becomes a potentially more serious issue with variable ND filters – these use two polarizing elements to allow you to vary the density by turning the filter. Again, due to the high number of glass elements, a poor quality variable ND will probably have some significant negative impact. With filters you really do often get what you pay for.
Colored Filters (Red, Yellow, Orange, Blue, Green of varying intensities)
These are almost never used today; most digital sensors have made them irrelevant. Colored filters were typically used in the film era with black and white photography.* A red filter darkens skies and creates a more gritty aesthetic; yellow darkens blues to separate the sky from the clouds and renders pleasing skin-tones; orange sits in the middle of those two, of course; blue lightens skies and darkens skin tones; and green filters were often used for landscapes or anything with a lot of foliage – they would lighten the surrounding-greens to give a more natural feel.
*Colored filters (in the broadest definition of that term) were not limited to black and white photography. 80 and 82 series filters were often used to warm an image, particularly if you needed to tone down the blue of a daylight film (keep in mind, most photographic film was balanced for daylight, but cinema film had either daylight or tungsten options). 81 and 85 series filters would cool the image – used to tone down the effects of tungsten lighting, or the golden tones at sunset, or any number of other situations. With digital, well, we have white balance in camera and in post. Warming and cooling filters are also used by cinematographers to correct tungsten-balanced film (cinema film comes in tungsten and daylight flavors) in daylight or vice versa, as some directors/cinematographers like the look of a tungsten film with an 85 filter during daylight, for example.
The lone exception here are monochrome sensors. With Bayer – or X-Trans or Foveon – we have the wonderful advantage of channel mixers; basically, we have the ability to use a multitude of colored filters and precisely control their effect/strength. Monochrome sensors, naturally, lack that ability – they’re no different than b&w film in this way. So, if you have a Leica Monochrom, you may be well-served by investing in some colored filters, though you still will never have the latitude of a channel mixer from a CFA – filters are global and channel mixing allows for precise local adjustments.
Polarizing Filters
There are two types of polarizing filters – linear and circular – but we’re just concerned with circular polarizers, often abbreviated CPL. Linear polarizers wreak havoc on the autofocus and metering systems of DSLRs and don’t play nicely with AA filters, among other issues.

Polarizing filters are also helpful for landscapes (before/after)
Image by David Joyce, Creative Commons License
A CPL is a comprised of a linear polarization element plus a waveplate – the former polarizes the selected light linearly and the waveplate converts this into circularly polarized light. The effect changes as you rotate the filter and is most often used to cut the polarized light from skies, which enhances contrast, and to remove or reduce unwanted reflections off water, glass, or other reflective substances. The CPL must be adjusted appropriately for every scene and angle – what most effectively reduces reflections from one point of view likely will not with another.
The biggest disadvantage of (most) CPLs is that, due to their design, you cannot easily stack other filters on top of them – if you need to combine, say, an ND and CPL, the CPL might need to be attached last. It also makes the use of a variable ND more difficult, if not impossible, because of this; both filters must be rotated to achieve the proper setting. I try to avoid variable NDs in general (except for video work), because they can have poor cross-frame consistency issues, especially at the extreme end.
Along with ND filters, CPLs are probably the most valuable and useful filters you can get – though naturally it depends on the type of photography you do. CPLs would hardly be of use for in-studio fashion photography. But if you do any landscape or nature photography especially, I’d highly recommend investing in one; better to spend a lot of money on a high-quality filter at the largest size you need and use step-down rings than multiple cheap filters.
Other Filter Types
There are dozens upon dozens of filters that do all manner of things, some of them nothing more than toy effects. But here’s a quick rundown of the most commonly useful filters:
Diffusion: These are filters typically used to soften the sometimes harsh and biting resolution of digital photography, or more commonly, cinema. They can be useful for portraiture, though you can usually accomplish similar effects with more control in post. Video is the main use for diffusion filters.
IR (Infrared): These are used with modified full-spectrum sensors to block visible light (usually up to around 720nm) for infrared photography. With full-spectrum sensors, you must use various filters to block out the unwanted light. There are also IR cut filters (mentioned above).
Light Pollution: These have a number of names - my Haida Nanopro is called “Clear-Night”, NiSi calls theirs “Natural Light,” Schneider has “True Cut” - but all of them are designed with the same purpose: to block the light emitted by sodium vapor lamps, which we commonly know as basic street lights. These filters have a strong magenta/pinkish color cast, but work wonderful for astrophotography if you are anywhere near a city. I have only used the Haida square Clear Night filters, which are excellent.
Brands I Like (Please Use Sidebar Links!)
B + W
Breakthrough Photography
Formatt Hitech Firecrest
Gobe (budget option)
Haida
Heliopan
Zeiss
Rare: Voigtlander APO-Lanthar 125/2.5 Macro at UsedPhotoPro
I don’t (and won’t) normally post items for sale like this, but this one deserves a special mention.
The Voigtlander 125mm f/2.5 Macro APO-Lanthar SL (Nikon Mount) is one of the rarest and most elusive lenses out there – in fact, this is the first time I’ve seen one for sale in the United States.
I don’t (and won’t) normally post items for sale like this, but this one deserves a special mention.
The Voigtlander 125mm f/2.5 Macro APO-Lanthar SL (Nikon Mount) is one of the rarest and most elusive lenses out there – in fact, this is the first time I’ve seen one for sale in the United States. There were very, very few of these made across a variety of different mounts. Voigtlander produced them along with the much more common 90/3.5 APO-Lanthar and the 180/4 APO-Lanthar, the latter of which is also quite rare.
Not only are these lenses difficult to find, but they are absolutely outstanding performers; the 180/4 is truly apochromatic and insanely small for its focal length. The 125/2.5 is also apochromatic, a little over a stop faster, and focuses to a full 1:1 macro.
Robert’s Camera (aka UsedPhotoPro when referring to their used department) has one on sale for $2,000 in excellent condition with the original hood (which are not easy or cheap to find) and box. Included is a six-month warranty.
Coupon code TAKE5 will save you 5%.
Please use the following link, which will provide me a (very) small referral fee. I just hope someone snaps this up because it’s a remarkable piece of glass.
Tripods: Part Two - Heads
Since we’ve covered the topic of what to look for when choosing tripod legs (along with some recommendations), we should logically cover the other half of that equation: a good tripod head. Choosing a head is quite a bit less complicated – you’ll know what kind you’re looking for and either they do the job or they don’t – but also somewhat frustrating because it’s practically impossible to gauge the actual quality until you use it yourself. It also depends on how strict your tolerances are; reading user reviews is probably the best way to narrow down potential purchases because sheer specs won’t tell you much.
Again, I need to apologize for the lack of product photos in this. Due to a combination of COVID-19 and dealing with my late uncle’s estate, I am not (and have not been) home in Tennessee for a while, so I do not have a lot of my gear with me here in Ohio.
Since we’ve covered the topic of what to look for when choosing tripod legs (along with some recommendations), we should logically cover the other half of that equation: a good tripod head. Choosing a head is quite a bit less complicated – you’ll know what kind you’re looking for and either they do the job or they don’t – but also somewhat frustrating because it’s practically impossible to gauge the actual quality until you use it yourself. It also depends on how strict your tolerances are; reading user reviews is probably the best way to narrow down potential purchases because sheer specs won’t tell you much.
There are far fewer variables when it comes to a head than the legs; the materials used isn’t typically a concern, you don’t have to worry about things like the number of leg sections, etc. A good head is one that allows you to do the job in the simplest, smoothest, and most stable way possible – if you don’t intend to take panoramic photos, you can easily rule out a specialized panoramic head. If your camera system is a tiny micro 4/3 mirrorless, you probably won’t need an Arca Swiss Cube.
So, I’ll just cover a few important points and then some suggestions. Again, these suggestions are only based on what I’ve used, which means equipment that I have no (or little) use for isn’t in the mix – for example, I don’t need a special head for panoramic or time lapse photography. If that’s what you need, you probably won’t find this very helpful.
First, determine what KIND of head you need. There are four primary types of heads: ball, geared (sometimes called pan & tilt), gimbal, and pistol grip. I don’t use gimbal heads, so we won’t get into that one. Avoid pistol grip heads; they seem appealing and cool, but I’ve never used one that could lock down with remotely decent accuracy. This leaves ball heads and geared heads – both are different enough and with their own advantages that you may want one of each. I’ll go into the differences and strengths of each shortly.
Determine your weight requirements: both load capacity and weight of the head itself. If you want a general head for a wide range of applications, you likely want something smaller and lighter. If you have a massive camera setup and/or you mostly stay in the studio, then the weight of a heavier head won’t be an issue.
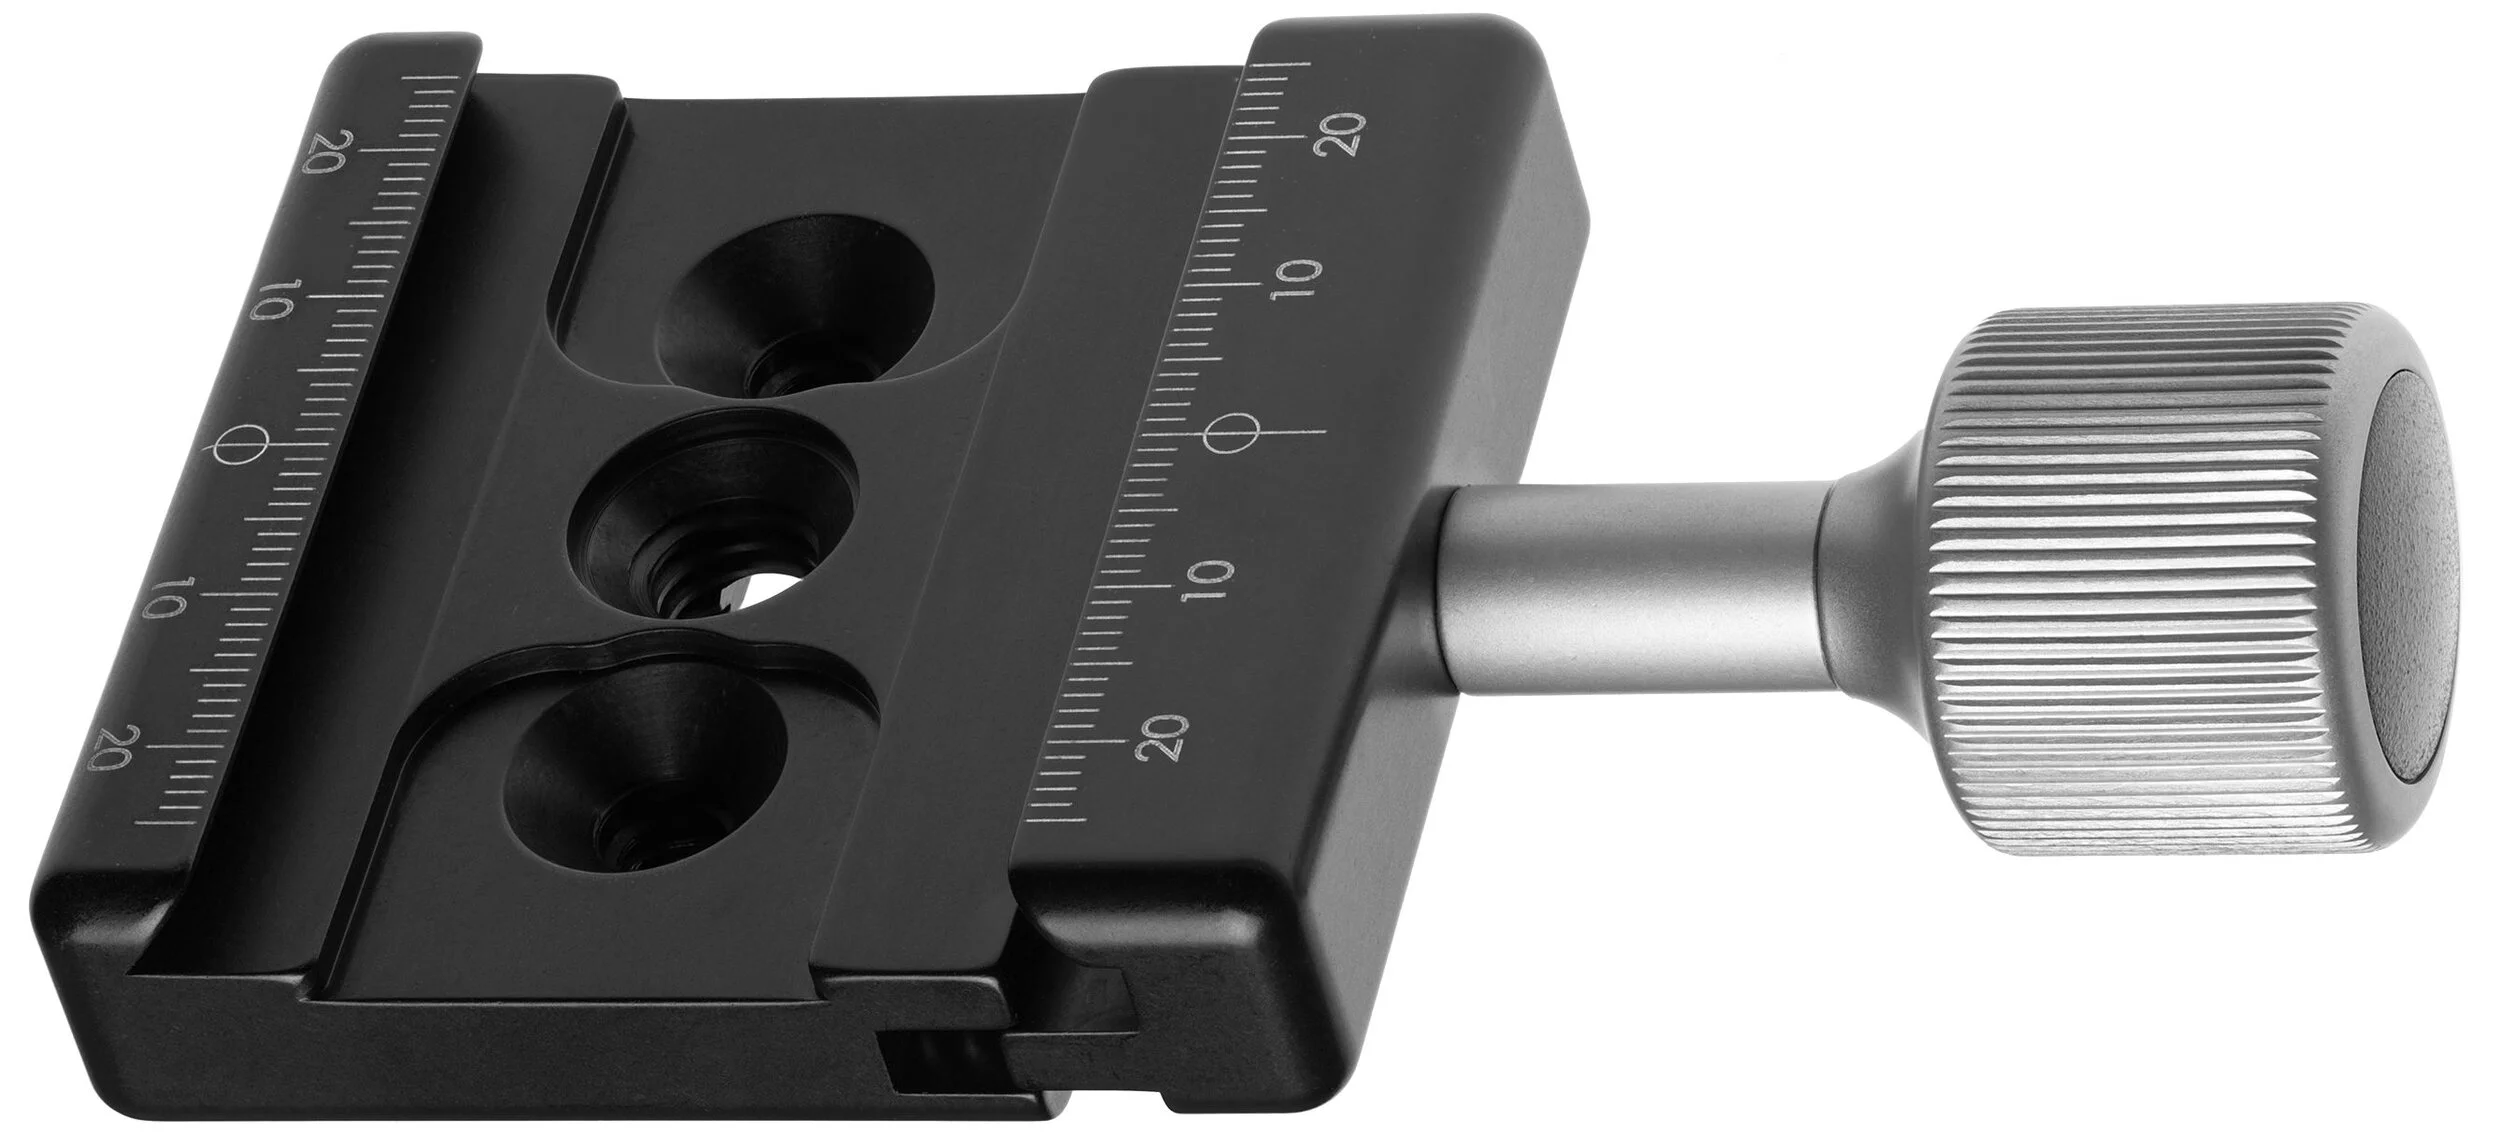
Arca Swiss compatible* or not? Heads will typically either have a proprietary QR connection or they will employ the classic Arca Swiss quick release clamp. The Arca Swiss QR is always my preference – it’s quick, simple, standardized, and with an Arca Swiss L-bracket it makes shooting in both orientations very simple. If this doesn’t matter to you one way or the other, then don’t worry about it. But be sure to check if the head comes with a plate (whether it’s Arca or not); if not, make sure to get one (factor this into the cost as well).
Arca Swiss clamp plate. Camera plate/bracket slides in and is locked in place by tightening the knob.
(Image from Wikipedia, Creative Commons license)
*For those who don’t know what a head with an Arca Swiss quick release means: Arca Swiss is a French manufacturer known primarily for their top-of-the-line large format view cameras, which are designed to integrate with digital backs or even DSLRs/MILCs. Outside of this ultra-niche high-end market, they’re best known for their “Arca Swiss Quick Release System” developed in the 1990s and has now essentially become a standard – and for good reason. An Arca QR base plate is a 35mm wide (length can vary) CNC machined component with a 45º degree dovetail and usually a standard 1/4-20 (some are 3/8) screw. The other part of the QR system is the clamp on the head, which allows the base plate to be slid in from either side – once it has been inserted, the clamp is then tightened usually via a simple twist knob (sometimes a flip lock). It’s incredibly simple, especially because it does not matter what direction or orientation you insert the base plate – it’s completely identical on each side. Most other manufacturers’ proprietary systems require a special orientation to mount and unmount the camera. Arca Swiss QR bases can come as a simple universal plate with rubberized grip, as a universal L-bracket, or – and this is the best part – a base plate or L-bracket designed specifically for your model of camera. This ensures that the camera or plate have absolutely no room to flex or shift. They’re also far nicer if you hate removing/attaching tripod plates constantly – most other systems are awkward and unpleasant when attached to a camera, but Arca Swiss plates don’t hinder your comfort or ability to handhold the camera – an L bracket can even make for a decent sort of left-handed grip.
Ball vs. Geared. This is an obvious extension of the first note. Ball heads are fairly basic; usually the camera mount (QR plate connection) is positioned on a “neck” which is linked to a ball joint – this is fitted inside the socket of the main “body” (which screws directly to the tripod) and allows you to swivel, pan, tilt, angle, etc. in pretty much any direction very quickly. A knob is then tightened to lock down the head once you have positioned your frame. The Arca Swiss p0 uses an inverted design – the camera mounts to the main body of the head, which then pivots atop the neck. It also uses a knurled ring to lock the head down, rather than a knob. But the general idea remains the same in either.
Geared heads operate completely differently. While the actual design can vary quite a lot from model to model, the basic function of a geared head is the use of multiple independent locking mechanisms. Unlike a ball head, which has a single lock and moves freely in all directions when unlocked, a geared head will only move along the axis that is unlocked. This allows for precise positioning and fine-tuned adjustments without disturbing the other movements. Conversely, it also makes it slower to deploy and use, since each direction of movement must be locked/unlocked independently. Geared heads usually have markings to indicate angle and position; ball heads won’t have these markings, though they usually have markings around the 360 degree pan rotation at the base.
Because of the simpler design and lack of multiple locks/handles, ball heads can be considerably smaller in packing volume than geared heads and a bit lighter in weight, though exceptions exist on both ends of course.
For me? I like ball heads for travel and in the field – they’re smaller to pack and quicker to deploy in use. Geared heads are great for studio and macro photography – “no rush” photography that may also require precise adjustments, which product and macro work certainly does.
Now, onto the difficult part. Finding a head that works and works well. This entirely depends on your tolerances – mine are extremely tight and not very forgiving. I’ve gone through maybe a dozen and a half heads, testing and usually returning if there were any obvious problems (I typically buy used or openbox from Adorama as I do not care for returning brand new merchandise unless there is an actual problem with it or it’s just total garbage; Open box items are also cheaper while still retaining full manufacturer warranty).
The most typical problem is the dreaded droop – minor downward movement of the frame after locking the head. Even with perfect locking technique (there is such a thing, believe it or not) this is often unavoidable entirely with a majority of heads – particularly ball heads. Droop becomes a bigger issue at higher magnifications or with tighter framing (i.e. macro or telephoto work) and/or with more weight – thankfully the latter has become less of an issue with the mirrorless revolution.
My work demands are such that I essentially cannot tolerate any droop at all. This was very frustrating for a long time because I never thought I’d find a ball head that perfectly locked down, but alas… I did. Actually, I found two.
Manfrotto Hydrostatic Ball Head (468MG) (~$280)
The first ball head I ever found that locked securely in place with no droop – seemingly without regard to the amount of weight to boot. This head differs from others in that it uses a unique vacuum chamber and pressurized hydraulic lock to secure the ball and joint. The large size of the side knob along with its rubber-textured surface make it incredibly easy to gently but securely lock the head without inducing unwanted movement. On the opposite side of the head is the standard knob lock that allows you to pan the head.
There are several variants of this head – the base 468MG, one with an RC2 QR plate, one with an RC4 QR plate, and one with an MSQ6PL QR plate. I have the latter, but as far as I know, all are the same quality head.
See here at Amazon and Adorama.
Arca Swiss Monoball p0 Ball Head (~$300-450)
Arca Swiss products are notoriously the opposite of cheap, but here is a quite affordable though absolutely top-of-the-line tripod head that comes in right around the same price as the Manfrotto Hydrostatic (depending on which variant you get of either).
As mentioned before, the p0 differs slightly in construction with the camera attaching directly to the body, inside which is the locking mechanism; most other designs separate these two. The upshot is that the locking mechanics are closer to the camera and the camera can rotate nearer to the ball (and therefore nearer to the center of gravity). It also means that you needn’t worry about leveling the base of the structure for panoramas or other stitching: the panning system is linked directly to the camera body.
The knurled ring that locks/unlocks the head is also very nice – I prefer it to the side knob of other designs because a) you don’t have to fumble around for it or worry about its positioning, b) it locks down with significantly more ease - I think this is a combination of both the design* and being a ring vs. knob.
*The locking ring has very little travel compared to what you’d expect from using other heads. When fully unlocked (it has hard stops, at least at the unlocked end) it takes only a few degrees of a turn to significantly tighten the head (but not totally) and only a bit more to totally and completely lock it. And it LOCKS - I’ve tried with all my might to move it with my hand and I simply cannot. A camera won’t even phase it.
Like the Hydrostatic, there are a few variants: the base with no plate connection, the Slidefix QS release, and the classic Arca Swiss QR release. I got the base with no clamp because it’s $70 cheaper than the Classic QR version and you can add a decent clamp of your choice for $20-30 or a nicer one for $50-120. I like the Feisol QRC-50 or one of the Really Right Stuff B2 variants with a dab of non-permanent Loctite (note: do NOT let the Loctite get onto the nut around the 1/4” screw on the head - that nut must be able to move to pan the head).
This is simply the best ball head money can buy below $500. I’d definitely recommend the p0 over the Hydrostatic, but you can’t go wrong with either – ultimately, it’ll probably come down to your preferences in the design, differences in price, and/or availability in your region. At roughly $300 for the base version, it isn’t necessarily cheap, but considering the quality, it’s truly impossible to be disappointed with it. Just a fantastic piece of engineering and one of my favorite gear investments; it’s basically permanently welded onto my Gitzo Traveler.
It’s worth mentioning the Manfrottos have warranties extendable to ten years, whereas the p0 has “only” a three year warranty (Adorama claims 5, they are wrong).
See here at Amazon and Adorama.
Gitzo GH2750 Series 2 Off Center Ball Head (~$275)
This was a very recent purchase and, somehow, I ended up incredibly lucky. I needed a second head and since I’m out of town, ordering one was my only option. I looked at a lot of options – considered a second p0 or Hydrostatic Head – and decided that if I’m going to spend a couple hundred bucks, I might as well get one that does something my other gear doesn’t. Lots of searching and pondering later, I came across a Gitzo GH2750 off center head, brand new and sold by Amazon, for $118. That was less than half the price I saw it listed anywhere else, even used on eBay. Since Amazon returns are simple and painless, there really wasn’t any risk in grabbing it up.
And I’m very pleased I did. Not only did I get a brand-new ball head that I can later sell at a profit, but this one does have some unique features that none of my others do – chiefly, the “off center” part of its name. The result is a head that can pivot and turn in literally any direction and assume any orientation without interference from other parts of the head. Not only does the neck pivot on the ball, but the housing of the ball can turn 360 degrees. This means you can achieve virtually any angle or framing you want without the need for an L-bracket. I wouldn’t use it this way with a huge medium-format camera unless you have a heavy, rock-steady tripod, but for regular mirrorless and DSLR cameras, it’s wonderful.
The head also locks down tight and exhibits no droop – at least none that I have noticed so far. The only niggle is that it doesn’t lock quite as easily as the Hydrostatic or p0; the knob requires more distance and torque compared to the others, which seemingly locks down with very little effort. The upshot of this is that you need to be careful to not knock your framing off when tightening the locking knob.
It also does not have any kind of built-in quick release, so you have to add your own (see above about the p0 for recommendations).
See here at Amazon and Adorama.
Sirui FD-01 Four-Way Geared Head (~$229)
Coming in at just $229, this geared head is surprisingly good. With an integrated Arca-type clamp, the FD-01 has four points of adjustability controlled by two knob locks and two handle-locks. One handle controls lateral movement and the other controls the vertical. Each of the knob locks control a 360 degree panning function – one at the base of the unit where it attaches to the legs and one at the top directly beneath the camera mount. The two separate panning systems allow greater flexibility and control for stitching and panoramas.
The head is an all-aluminum construction weighing in at 1.7 pounds with a rated load capacity of 22.1 pounds. I’ve only used this head with smaller gear (usually micro 4/3, occasionally FF mirrorless), so I have no experience with a large DSLR setup on it. But for the lighter-weight work, it is very sturdy and smooth in operation; you have to be gentle when locking the handles so you don’t shift the frame, but that is standard with any of the smaller geared heads.
With a six-year warranty and seemingly excellent construction, there isn’t much to complain about at this price if you aren’t planning to stick a monster setup on top of it. The head finely handles macro work with, for example, an Olympus E-M1 Mark II, Olympus 60/2.8, and accompanying flash trigger. If you have a DSLR + 85mm PC-E (for example), I’d look at something a bit higher end, like the next two recommendations.
See here at Amazon and Adorama.
Arca Swiss d4 Geared Head (~$849-$1169)
Jumping up quite a lot in price, we get to the impressive (though not cheap) Arca Swiss d4 which is essentially a hybrid head of sorts that combines the quick-deployment advantages of a ball head with the precision controls and adjustment capability of a geared head. With the horizontal and vertical axes unlocked, you can freely move the camera about like a ball head – however unlike a ball head, you can independently lock each one and operate as a geared head.
This is the pinnacle of small, lightweight tripod heads in every way. Weighing only 1.8 pounds, it has a rated load capacity of 75 pounds, and I wouldn’t bet against it. There are several variants – the Classic Arca, the Fliplock lever, and the monoballFix – the latter of which is several hundred dollars cheaper than the others and is my recommendation (along with an accompanying monoballFix plate) for that reason alone.
This is my primary head in the studio, supplanting the beautiful C1 Cube. Once I switched mostly to mirrorless for product/macro work*, I had to face the fact that the d4 is absolutely more than enough for any of my needs in the studio. The Cube is an insanely brilliant piece of engineering, and if you need all of what it offers then there isn’t a substitute – but otherwise you’re better off with the smaller, lighter, cheaper, and more flexible d4. Even with a moderately hefty DSLR setup, you’ll probably find your needs served by the d4 – it can certainly hold the weight.
*If you’re wondering why I use a Z6 over the D810 for product, it’s because a) the massive benefits of live-view and a tilt screen; especially with a lens like the 85 PC-E (or any tilt-shift lens), which you can now use handheld and see the true adjusted focus plane and/or shift in live-view which is a notorious issue when using an OVF, b) IBIS - and the tilt screen - allows me to do a decent amount of my work handheld, which was certainly never the case with the DSLRs - plus live-view has PDAF, and c) the lower density sensor permits roughly one more stop down for extended depth of field before diffraction kicks in. Plus, I almost never need 36MP product photos. The D810 still remains as a brilliant landscape tool - ISO 64 and incredible highlight headroom are not insignificant; also, the DSLRs are still superior for wildlife (and long lenses) as well as tracking AF.
The p0 is still used for most of my outdoor/travel work since it’s about a pound lighter and less packing volume than the d4 – it’s also nice to have a head basically welded to my Gitzo Traveler, ready to pick up and go, and one that stays behind on the larger tripods. I’m not a fan of constantly swapping out gear.
See here at Amazon and Adorama.
I won’t get too much into the Arca Swiss C1 Cube – it exists in a rather binary realm where you either need what it offers or you don’t. It’s large, bulky, expensive, and slower to use compared to other options; buy the d4 or something cheaper unless you need what the Cube offers. If you do, you’ll know it, and there isn’t anything better. I loved it, but found the flexibility of the d4 to outweigh the few benefits of the Cube (for me) and certainly couldn’t justify both. See here at Amazon and Adorama.

Pssssst, Nikon: My Z Camera Wishlist
Recently, it became official: the Nikon Z series cameras have almost entirely replaced my DSLR for in-studio work and portraiture. The D810 still lives for the outdoors – landscapes and wildlife in particular.
Having used the Z series for about 15 months now, the amazing haptics, seamless transition, and absolutely brilliant lenses clinched the deal. In fact, I consider the Z6 and Z7 two of the finest digital cameras (period) ever made and certainly near the top of the best MILCs. No one else has made a full-frame mirrorless camera with such an excellent design and seamless transition from the DSLR counterparts; not to mention the enormous lens library if you consider existing F-Mount lenses with the adapter. Canon succeeds on the latter front, but the EOS R was an underwhelming mess of design and features (I am very impressed with the 1DX Mark III, however, and the EOS R5 and R6 seem to have fixed the terrible ergonomics of the R).
Taken with iPhone 8 in DNG via Lightroom Mobile, edited in ACR/PS
So, having spent a good amount of time now with the Nikon Z6 and Z50*, I feel pretty comfortable discussing a few of the shortcomings and features I would like to see implemented in the next iteration(s). A fair number of these would also apply in general to most mirrorless cameras – be it features that exist in some cameras but inexplicably not in all, or features that don’t exist at all but should.
The recently-announced Z5 addresses one of these features (dual card slots), however it uses two SD slots – I would like to see either dual CFexpress or CFexpress + SD in the next generations.
*Most of these apply more to the Z6/Z7 but a number are (or could be) applicable to the Z50 as well.
Firmware Updatable
Linear manual focus modes for Z lenses* – this should be a standard option on all mirrorless cameras. Fly-by-wire manual focusing is already a nightmare without the haptic feedback of a helicoid – not to mention the lag and subsequent backlash in focusing precision. Plus, with the increasingly video-stills hybrid nature of cameras, there is no reason not to have this (Fuji does it). Spend five minutes trying to pull focus during a video with fly-by-wire lenses and you'll want to shatter the camera. And no, there isn’t any mirrorless camera with sufficient video AF-C. Even the cameras that can keep focus locked, the transitions are still very harsh and uncinematic (particularly when “racking” focus from near to far or far to near). Possible exception is Canon and their dual-pixel AF, but I haven’t used their EOS R cameras enough to testify one way or another. The EOS cinema cameras are great and the 1DX Mark III is likewise very impressive.
*For those who don’t know: most AF DSLR lenses (except some newer ones, e.g. Nikon’s AF-P) and manual focus lenses have focus rings that are coupled to built-in helicoids. This gives them linear, mechanical, repeatable focus, usually with hard stops at each end in the case of non-AF lenses. The focus ring on a focus-by-wire design is not mechanically linked to anything and isn’t linear – turn the ring slowly and it may take 300 degrees to cover the full range; give it a quick twist and it may do it in 25 degrees. Not to mention, due to the lack of physical coupling, there is always lag between when you initiate/stop focus and when the camera indicates that you have, making it impossible to tell when you’ve hit your mark - inevitably ending up in you overshooting the target. Focus-by-wire is undoubtedly superior for autofocus, but it is garbage for manual focusing without some user selectable adjustments in its behavior (like Fuji offers) or rackable linear focus modes with hard stops a la some Sony and Olympus lenses.IBIS based pixel shift for full color sampling and high-resolution still-life / product / landscape (see: numerous cameras from Olympus, Sony, Pentax, Leica, Panasonic). Note: not sure if this is firmware updatable or would require hardware adjustments in the imaging or processing pipeline. Leica added it to the SL2 via firmware so my guess is Nikon could too.
IBIS based astro-tracer (Pentax K-1) Note: again, not sure if this is firmware updatable or not, but as above, I don’t see why not.
Rotate monitor/EVF info when shooting in portrait orientation (why everyone doesn’t do this is beyond me)
In-camera focus stacked output. The Z’s can already do focus bracketing (or "shift" in Nikon-speak) but an option for in-camera blending and output (e.g. Olympus) would be nice for those who would prefer to bypass the Photoshop step; the excellent JPEG output from these cameras makes this a worthwhile feature. Of course, it should also still save the individual raw files.
Live Exposure modes: Olympus calls these Live Composite and Live Bulb. They may be proprietary, though the iPhone has a similar feature as may other cameras. Essentially, each mode allows you to see the image “develop” without waiting for the exposure to end (meaning you can end the exposure once it’s exposed to your liking). Live Composite shoots a series of consecutive frames and blends them into a pseudo-long exposure. Live Bulb is like a regular bulb mode, except the screen refreshes every so-many seconds (you set the frequency based on your exposure time as the sensor is only capable of 24 refreshes, I believe - e.g. a 48s exposure would refresh every two seconds).
Auto ETTR Metering Mode – auto expose to the right just until highlights clip. Think of it as an automatic exposure compensation mode. Highlight priority metering kind of does this, except in the reverse: it’s used to prevent highlight blowout by metering for the highlights (so, in a sense, applying a negative exposure comp). But in the case of ETTR, you want what the camera considers overexposure. Note that this is for RAW shooting only. JPEG shooters DO NOT want to ETTR.
Customizable thresholds for Auto EFCS. Currently this setting switches from EFC to mechanical at 1/320 (I believe), but it would be nice to have it simply switch over at 1/2000 or whatever speed you choose.
More flexible Auto-ISO thresholds. The "slow" to "fast" is decent (lowest appears to default to a little over 1/4x focal length), but more precise values – rather than ambiguous low-to-high steps – would be very nice. The Z50 is even less customizable than the FX cameras.
Allow non-CPU lens data selection to be assigned into the i-Menu. You can assign it to a function button, but not the quick access menu, which is senseless.
Add 21, 40, 75, and 90mm to the options in non-CPU data; they have 43mm and 86mm because once upon a time Nikon made a 43-86mm lens, but no 40mm or 90mm. Nikon: this is a mirrorless camera, people will be adapting all kinds of lenses. This could easily go for other focal lengths as well, these are just the ones I have noticed missing.
Proper shutter speeds in video mode to mimic shutter angle (e.g. 1/48th = 180°). As far as I’m concerned, just call it 180°, 172.8°, etc. when in video mode. The latter is both more consistent and easier coming from cinema cameras and eliminates the need to adjust shutter speed when changing your frame rate.
Fully separate the video and stills menus. In photo mode, you should see all photo-centric options in the menu and only those options. In video mode, you have only video-centric options. For the photo menu, just remove the video tab and a couple other options. For the video menu, redesign it entirely from scratch. For a camera that can output 12-bit RAW, a dedicated video only menu should be there. That, I feel, is one of the best possible changes to fully bring hybrid mirrorless cameras to maturity on the video front. When I’m shooting video on most of these types of cameras (whether Nikon, Canon, Panasonic, etc), I’m constantly frustrated by the cluttered menus and options and symbols that are entirely irrelevant to me (even if greyed out). A completely new video menu (think Blackmagic – easily the best videocentric menu interface out there in a camera under $5,000) would benefit stills and video shooters alike.
Z50 only – already implemented in Z6/7: option to use EVF only for shooting and the LCD for menu/image review. Currently our options are just EVF Only, Monitor Only, or Auto Switch.
Next Generation Additions/Changes
Dual Card Slots – while the choice to use the more robust XQD (and now CFexpress) format was a good one, and the single card slot doesn’t personally bother me, I would obviously prefer a second slot. No reason a UHS-II SD slot can’t fit in along with it, perhaps with a few millimeters of adjustment to the dimensions.
Internal 4K 10-bit 4:2:2 with N-Log gamma; leave HDMI output for the 12-bit ProRes RAW (though internal RAW video is not something I’d complain about – it would probably have to be Blackmagic RAW or similar, though, which is a superb format).
Sub-dial under the PASM (e.g. Fuji X-T3, X-H1, Panasonic S1/S1R) for either metering mode (my preference) or drive mode. Avoiding menu diving (even into the easily accessible i-Menu) as much as possible is preferable.
Mode dial should be permanently unlockable (e.g. Olympus). Push down to lock, push down again to unlock – we retain the option to leave it unlocked.
Taken with iPhone 8 in DNG via Lightroom Mobile, edited in ACR/PS
Electrical contacts for a vertical battery grip – the vertical grip Nikon finally released (sans any buttons or dials) was nothing but a joke at that price, and provided no controls. I don’t see the point in a vertical grip at all if you still have to awkwardly maneuver your hand to the regular controls to adjust settings and take a photo. I don’t even see how it helps with larger lenses.
FTZ adapter with Arca Swiss detachable tripod foot. I shouldn’t have to purchase two L-brackets (one for the camera, one for the adapter) because you decided to make a non-Arca Swiss non-removable tripod attachment. Fotodiox Pro and Metabones adapters are Arca compatible and removable. Or, if that’s too difficult, at least make one with no tripod mount - it can really get in the way when on a tripod.
Electronic front curtain at all shutter speeds (currently tops out at 1/2000). I assume this is a hardware limitation in the Z6/Z7 given that prior DSLR models had no such limit; it might be due to readout limitations at the faster speeds.
LCD that tilts in portrait orientation (e.g. numerous Fujis, Panasonic S1/S1R)
User selectable raw color – e.g. “Neutral Color” and “Nikon Color." This would work best if the Neutral mode was standardized across all manufacturers (pipe-dream). All companies have their own color and tonal adjustments baked into the raw files. Some kind of neutrality would make consistency much easier to achieve between different makes and models without having to jump through hoops in ACR or whatever you use. But, since that will never happen, I’d be happy with a simple “neutral color” mode that was standardized across all Nikon models (though tonal response, particularly at either end of the curve, will still vary from model to model based on the sensor architecture, processor, among many other factors). I’d love if my Z50 and D810 had the same color. Hasselblad is the only company I know of that does anything like this, with their “Natural Color Solution.”
Ishimoto Blog:
Integer posuere erat a ante venenatis dapibus posuere velit aliquet. Fusce dapibus, tellus ac cursus commodo, tortor mauris condimentum nibh, ut fermentum massa justo sit amet risus.