Update: March 2021
Again, I must apologize for the complete lack of content on here recently.
Focus and priorities have been split off in so many different directions - along with significant monetary issues - that I’ve done very little…..
Again, I must apologize for the complete lack of content on here recently.
Focus and priorities have been split off in so many different directions - along with significant monetary issues - that I’ve done very little dedicated photography (as in, going somewhere with the purpose to photograph) so far this year. I won’t get into the details, because frankly there are just too many (and some are not for me to share).
Zeiss 2/25 Distagon ZE - one of the recent pieces of gear I had to part ways with.
At any rate, I am working on a number of articles, both hardware related and technique/theory related, which will be finished soon. I’m also in the process of revamping the site (a seemingly never-ending project), particularly the portfolio section. So that takes a good deal of time because I left my computer skills behind after high school.
Please check back soon!

FINE ART PRINTS ON SALE - 15 to 30% Off!!
Visit the Store for Sale Items
Any Photos in the Portfolio Available Upon Request
35mm Camera Recommendations (Part One: SLR & Rangefinders)
Film has experienced a bit of a resurgence in the past five or so years. We’ve seen a proliferation of never-before-made film stocks and even some of the ones killed off have been brought back to life (Fujifilm Acros 100 – my favorite b&w stock). As a life-long avid shooter of film, from 35mm to 4x5, and experience with thousands of camera models, I thought I’d do a post on my own suggestions…….
Film has experienced a bit of a resurgence in the past five or so years. We’ve seen a proliferation of never-before-made film stocks and even some of the ones killed off have been brought back to life (Fujifilm Acros 100 – my favorite b&w stock). As a life-long avid shooter of film, from 35mm to 4x5, and experience with thousands of camera models, I thought I’d do a post on my own suggestions – from sub-$100 bargains to collectible, premium offerings.
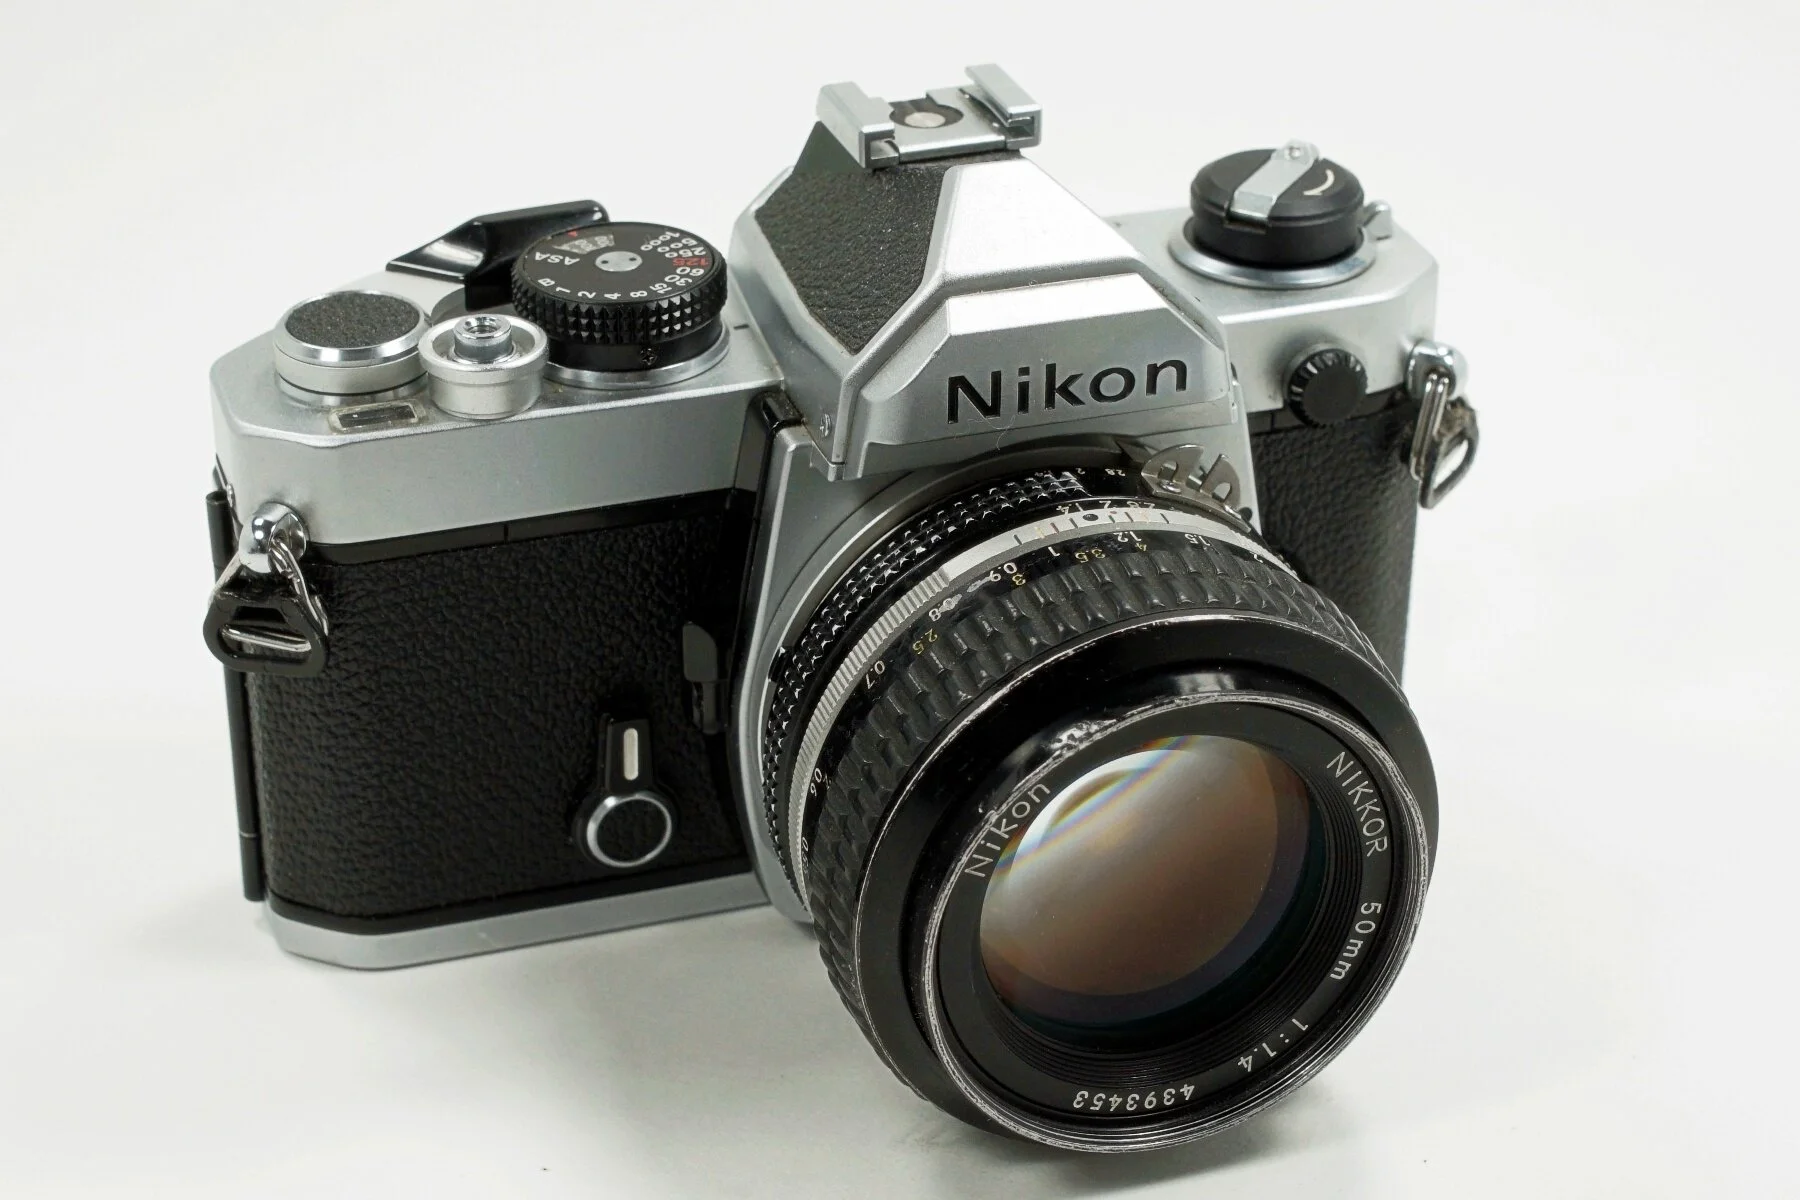
Nikon FM w/ Nikkor 50/1.4 AI-S
Each pick is only that – my choice based on user experience and, naturally, my personal preferences. There are obviously dozens, if not hundreds, of other options that others may prefer. None of my picks are meant to imply that others are inferior; so, before you ask “what about [so and so]??” please keep in mind that I guarantee I already considered it, I probably love the camera, and simply prefer whatever I chose instead. Though I will say almost all of these are limited to manual focus cameras only. Maybe I’ll do a later article on autofocus 35mm cameras, because there are plenty of truly great ones (Nikon F100, Pentax MZ-S, Canon EOS-1, Minolta Maxxum 9 (a-9), Nikon F4/F5, etc, etc).
I will do further articles on 35mm compacts and medium-format options, as well. This one is limited to 35mm interchangeable lens cameras.
(Pictures are from cameras/lenses I’ve had in my possession - often quite briefly - over the years, so the quality is not great)
Ultra-Bargain (<$75 w/ lens)
Yashica FX-103 Program
This is actually one of my favorite hidden gems of the film world and can routinely be found with a Yashica 50mm lens for $50-75. It uses the Contax Yashica (C/Y for short) bayonet mount, which means it can utilize all of the extremely excellent Contax Zeiss lenses, many of which are still incredibly good even on high-resolution digital cameras. In fact, many of the lenses were so good that some of their designs exist to this day in the Zeiss Milvus series.
Contax themselves produced a number of great 35mm bodies, many with some incredibly advanced features (the Contax AX can autofocus with manual focus lenses). However, a lot of these are motor-wound (meaning no film advance lever) and most have reversed controls with the shutter speed dial on the left-hand side. I tend to prefer the simplicity and tactility of a manual advance lever and traditionally placed shutter speed dial.
The FX-103 Program has four modes: P (Program), HP (High Speed Program), A (Aperture Priority), and M (Manual). That’s far more than most cameras in this price range, plus it has an unusually extensive ASA range from 12 to 3200. There really isn’t anything to complain about here.
Bargain ($100-175)
Minolta X-570 or X-700
There are a number of great options I considered here; Nikon FE, Nikon FM, Pentax K2 or MX, but ultimately settled on the Minoltas because the X-570 was one of my first cameras and they’re powerhouses – loaded with features, and compared to the Nikons or Pentaxes, the glass is a good deal more affordable. The X-700 has Program and Aperture Priority, and Manual modes; the X-570 lacks Program, which is honestly not a mode I ever use with 35mm cameras anyway. Otherwise, the bodies and features are nearly identical.
There are a plethora of great Minolta lenses available at very reasonable prices; there is also the renowned 58/1.2 Rokkor which is a nice chunk of glass that produces lovely, dreamy images wide-open. Even that lens can be found at fairly decent prices. Your regular 50/1.8 or 50/1.7 lenses are dirt cheap and 50/1.4 or 55/1.4 lenses are incredibly affordable as well.
Make sure to check compatibility between lens type (MD vs MC) if you intend to use the X-700’s program auto mode (MC lenses are aperture priority or manual only).
Nikon FA
In the 1970s and early 80s, Nikon made a number of exceptional “mid-range” models – that is to say, they were designed to be a step down from the top-end Nikon F2/F3 variants. But, they proved highly reliable, durable, and a bit more compact – so they found a huge home with photographers of all kinds. These models included the Nikon FE, FE2, FM, FM2, and the ahead-of-its-time Nikon FA. Introduced the year after the FM2 and the same year as the FE2, it was positioned as an advanced amateur body. Yet, one feature in particular – its multi-segmented exposure meter – was the first of its kind. Today it’s better known as matrix metering (Nikon), evaluative (Canon), multi (Fujifilm & Sony), etc. It’s a now-commonplace metering mode that utilizes a microprocessor to analyze a scene and select the appropriate exposure.
Nikon FA w/ Motor Drive
The FA also offered four exposure modes – Manual, Aperture Priority, Shutter Priority, and Program Auto. This was, again, a first for a Nikon camera until 1988’s Nikon F4.
Lastly, the FA could mount AI, AI-S, AI-P, and non-AI lenses (though the latter would not be able to make use of all exposure modes). I believe it was the last body with the ability to accept non-AI lenses until the FM3A many years later.
Today, excellent copies can be found for $100-130, easily. It’s a steal.
Mid-Range ($200-500)
There are tons of amazing options in this range and I could do a list of 30 of them. But I’ve picked five favorites of mine from five completely different line-ups.
Nikon F3 / F3HP
The Nikon F3 is one of the finest cameras ever camera – by anyone. It is nothing short of perfect; rock-solid build, amazing ergonomics, and one of the most dependable cameras I’ve come across.
The F3 is, of course, the successor to the legendary Nikon F2, but this time with a built-in light meter (no clunky finder necessary) and aperture-priority automation. Like Nikon’s FE/FE2/FA models, the F3 has an electronically controlled shutter, so it will not function without batteries (though on a personal note, in my experience with thousands of cameras, the longevity and reliability of mechanical and electronic cameras is no different – do not be concerned about it, at all).
Its successor – the F4 – was a revolutionary camera and well-worth owning if you need autofocus, but me? I like manual focusing on the nice, bright, beautiful matte screen, and – while it may seem minor – I like a thumb-operated film advance as opposed to automatic motor winders found in the F4 and all later autofocus cameras.
The F3HP is simply the F3 with a high eye-point finder (very nice for those of us who wear glasses). Since the finders are interchangeable, a regular F3 can become an F3HP by swapping in the DE-3 finder, and an F3HP can use one of the many other finders available – including the basic DE-2 finder. There’s even a (very cool) waist level finder available (DW-3). Focusing screens are also easily interchangeable.
Minolta XK (aka XM, aka X-1)
I have a fair number of cameras that I came across or fixed and then sold, now wishing I hadn’t. The Minolta XK would rank up there quite high, along with the Contax S2 described below.
Quite simply, this thing is an almost brick. It may be the most solidly built 35mm camera ever made. With the AE prism (includes aperture-priority) finder attached, it is a hulking beast with tall shutter speed and ISO dials (not unlike the Nikon F2 with Photomic Finder, except larger). With the plain and unmetered P-finder, the camera has a much sleeker design (again, not unlike the Nikon F2 with the unmetered DE-1. Like the F3, a waist level finder is also available.
With eleven interchangeable focus screens, a horizontally traveling titanium shutter, and a beyond impressive brass construction, this is one of the finest cameras of its time. Lenses are also excellent in quality and now low in price compared to glass from Olympus, Nikon, Pentax, and others.
Contax S2
The Contax S2 is on the higher-end of the price spectrum compared to some of these others, depending on condition and where you buy from (KEH currently has one for $542; I have seen some from Japan for $400).
This is one of the last Contax C/Y bodies released – done so to commemorate the 60th anniversary of Contax cameras (some bodies even have “60 Years” emblazoned on the front – naturally they fetch a higher price tag.
The S2 (and later, the S2b) are actually rather simple cameras. Mechanical shutter, no auto-exposure modes, and a simple spot-meter (unusual at the same) powered by two LR44 batteries. It’s as basic in operation as a Pentax K1000 or Nikon FM.
The beauty, I suppose, lies in this simplicity. Unlike previous Contax bodies, which swung for the technological fences, the S2 was as minimalist as it gets – and I actually quite like the spot-only meter. And, unlike prior bodies, the design is more akin to the standard orientation of Nikon, Pentax, Canon, etc. bodies: shutter speed dial on the right, ASA dial/exposure compensation on the left, manual film advance lever. The main reason I preferred Yashica bodies over Contax was due to their reverse shutter/ASA dial positioning and (often) motor-driven film advance. The S2/S2b is none of this.
It pairs particularly well with the phenomenal Contax Zeiss 45/2.8 Tessar.
The S2b uses a center-weighted meter and is available in a lovely graphite finish. Otherwise, the two are identical.
Contax G1 (Green Label)
Contax – again pioneering some of the most innovative technology – surprised the camera world in 1994 when they released an autofocus rangefinder. That camera was the G1: a titanium-clad body with electronically controlled exposure, autofocus, and rangefinder system. Lenses are screw-driven via an in-body motor that turns a pin on the lens mount, forcing the helicoid back and forth.
Unlike every other rangefinder camera to that point (and since then), the viewfinder field-of-view changes depending on the lens being used. That is to say, instead of relying on a small box in the middle of the frame for a 90mm lens, the viewfinder “zooms” to fill the entire frame (not unlike a modern mirrorless camera).
None of this would be wholly persuasive to convince you to add it to your bag, but the lenses are what clinch the deal. Like most Contax lenses, G-mount glass was made by Carl Zeiss – and they are some of the company’s finest work. Ranging from a 16mm Hologon to a 90mm Sonnar, all of the lenses are optical works of art. In my opinion, the 90/2.8 Sonnar and 45/2 Planar stand out as the crown jewels, though I have heard the 16/8 Hologon is a true beauty (and also very expensive).
Zeiss Sonnar 90mm f/2.8 for Contax G
The 90 Sonnar can be found dirt-cheap (<$200) and is a must-have lens for any G1 or G2 owner. It also adapts easily to most mirrorless systems (Sony E, Fuji X, Micro 4/3, Nikon Z, maybe more) – though due to the lack of a focus ring on G lenses, focus must be controlled by a ring on the adapter. I actually didn’t mind this at all (I use a Fotodiox Pro and a Metabones – both great, with an edge to Metabones). The 28mm and wider lenses don’t perform as well on digital bodies, but the 45 and 90 lenses are excellent.
If you search for Contax G1 bodies, you may find some described as “green label.” These are updated versions with modified ROM and will have a literal green label inside where the film canister sits. The upgrade allows these bodies to use the 21 and 35mm lenses (regular G1’s can only use the 16, 28, 45, and 90 lenses). No G1 can use the 35-70 zoom.
Leica CL/Leitz Minolta CL/Minolta CLE
When it comes to rangefinders, the Leica CL (sometimes labeled Leitz Minolta CL) is one of the best deals on the market currently.
The CL was designed in concert with Minolta. Unlike many other M-mount rangefinders, the CL has framelines for 40mm lenses – along with 50 and 90mm. Leica and Minolta designed and released a Leica 40/2 Summicron (almost certainly a wholly Minolta design) that was bundled with the camera as well as a Leica Elmar-C 90/4.
Like the M5 that was released one year prior, the CL uses CdS meter on a pivoting arm in front of the shutter that drops down right before the moment of exposure. Because of this, certain lenses cannot be mounted without damaging the arm: those with excessively protruding rear elements (usually wide-angle) and collapsible lenses (which can be used if you don’t fully collapse them).
Seven years later, Minolta introduced the very similar Minolta CLE – one of the most advanced rangefinders of its time due to the presence of aperture-priority autoexposure (something Leica wouldn’t accomplish until the release of the M7 decades later).
Example of white spots and coating damage on an M-Rokkor 28/2.8. There was little effect on image quality, with the exception of excessive flare when directed toward a strong point source (and without a hood).
The CLE included framelines for 28, 40, and 90mm lenses – the former due to Minolta’s introduction of the M-Rokkor 28/2.8. They also released the M-Rokkor 40/2 and M-Rokkor 90/4 – these two being identical to the previous Leica versions, as far as I know. The M-Rokkor 28mm is notable for its development of white spots inside (which often don’t affect the image) and the middling durability of its coating. Nonetheless, all three lenses are exceptional optics.
……………..CONTINUED IN PART TWO
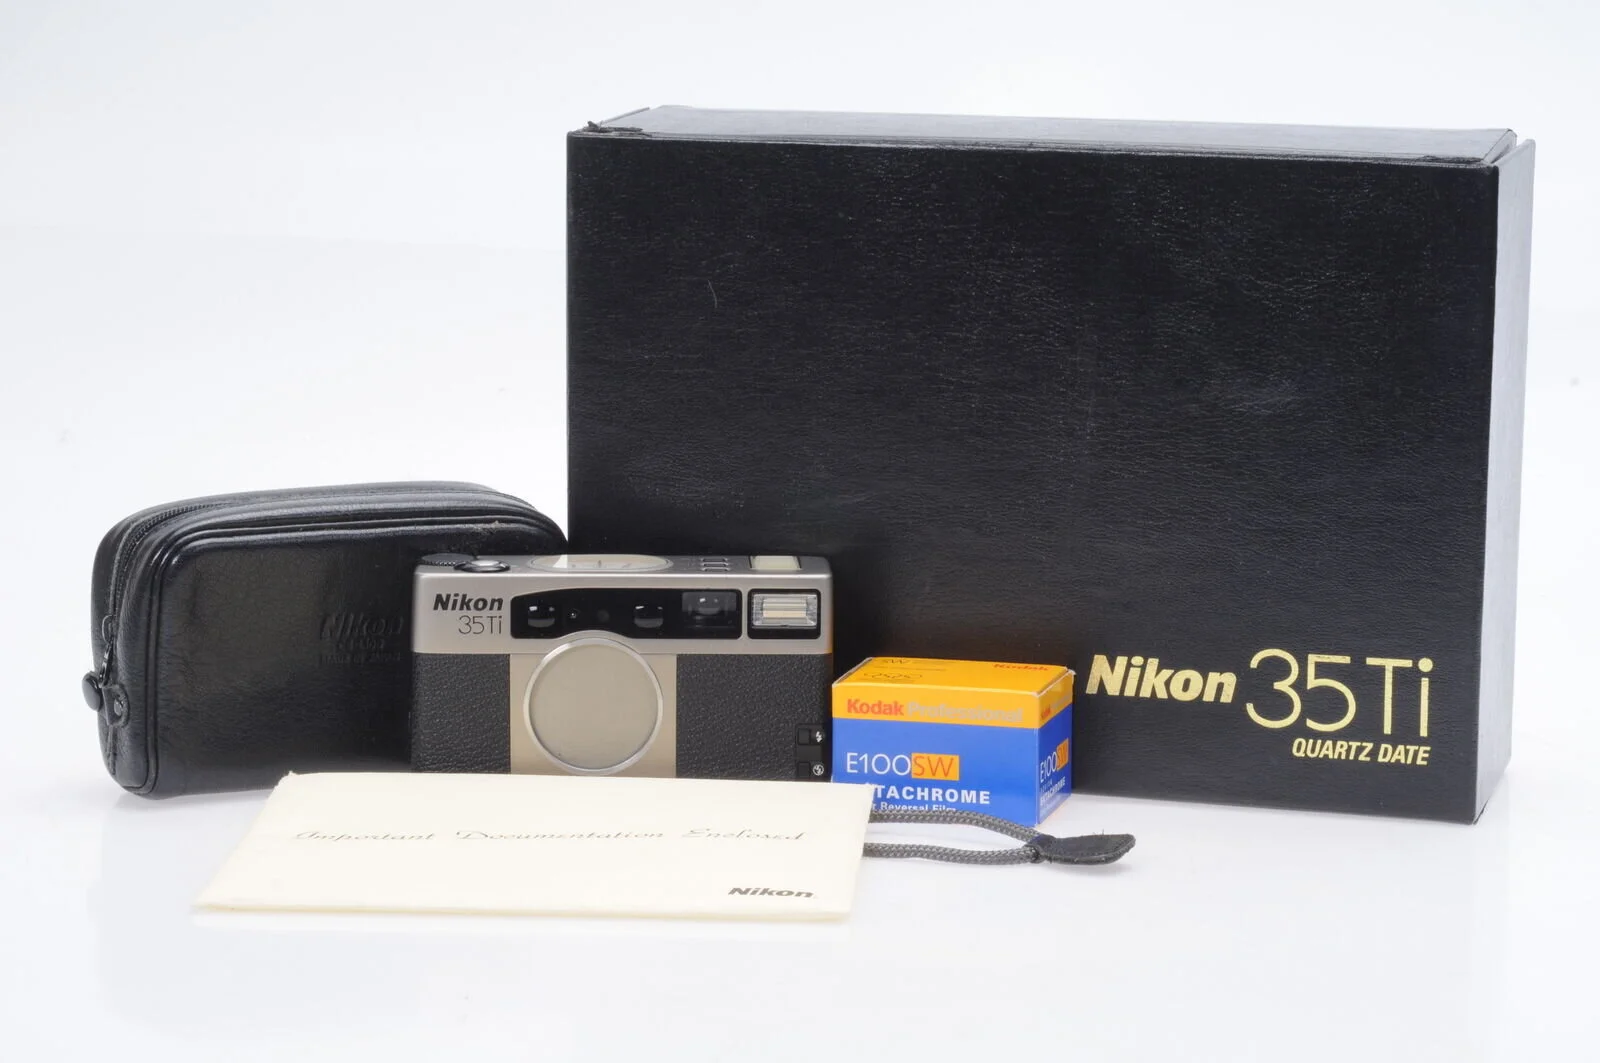
New Acquisition: Nikon 35Ti
The Nikon 35Ti (and, by extension, the 28Ti - depending on what focal length you want) has always been an extremely interesting and desirable camera for me. I’ve always wanted one premium compact point and shoot in my collection….
There isn’t much to say here - yet. A full review will be forthcoming once I’ve, you know, actually used the camera.
The Nikon 35Ti (and, by extension, the 28Ti - depending on what focal length you want) has always been an extremely interesting and desirable camera for me. I’ve always wanted one premium compact point and shoot in my collection (“collection” meaning “things that look good on a shelf AND that I use”).
I had a Leica Minilux once upon a time, but the viewfinder was utterly abysmal and the camera was, overall, not for me - at least not at that price.
I’ve had a number of others in my possession, usually cameras that I fixed and immediately sold: Contax T2, TVS, TVS II, Konica Hexar AF, and the more usual suspects like Rollei 35, Olympus XA, Olympus Mju, etc. I was most impressed by the Contax T2 and Hexar AF…. with a serious case of seller’s remorse on the T2 all these years later where it’s now double the price (at least).
For the past couple years, I’ve lusted after a Minolta TC-1 or a Nikon 35Ti.
Lo and behold, I came across an excellent condition 35Ti with all original packaging (even including the roll of Ektachrome that was sold with the camera).
From top (clockwise): 1) Number of shots taken, 2) Aperture - either chosen by you in A priority or by the camera in P, 3) Exposure compensation, 4) Focus distance
So far, I am a happy camper. The top panel dials receive mixed reactions - personally, I love them. For the same reason I like the top LCD panel on the Nikon Z cameras, I can walk around with all basic parameters set without ever bringing the camera to my eye. And the viewfinder doesn’t get cluttered with info, just the shutter speed.
It’s now loaded with a roll of Fujifilm Acros 100 II…. so I’ll check back soon.
Update: Sorry for the Lack of Posts
I realize posts have been sparse the last few months. There has been a lot going on in my personal life, and additionally I have been directing all my focus on writing and finishing several scripts.
I have a number of posts in the works - many at least half written - including a review of the Nikon Z 24-200mm f/4-6.3……
I realize posts have been sparse the last few months. There has been a lot going on in my personal life, and additionally I have been directing all my focus on writing and finishing several scripts.
One of several current screenplay projects
I have a number of posts in the works - many at least half written - including a review of the Nikon Z 24-200mm f/4-6.3, which I received back in August thanks to NPS Priority Delivery. Short and sweet thoughts: an excellent lens that feels like a successor to the Nikkor 24-120/4 with superior image quality and more range. In fact, I sold my 24-70/4 S in favor of the 24-200.
I also recently purchased the DJI Mavic Pro 2, so expect some content regarding that (it is arriving today, so I haven’t even used it yet).
Thanks for reading and stay tuned.
To Filter or Not: UV, ND, Polarizing, and Other
One of the longest running debates on the Internet is the use of filtration – specifically UV (ultraviolet) filters. Some see UV filters as instruments of protection (of their lens) without any real consequences; others see them as sacrilegious pieces of inferior glass that compromise image quality. So, let’s get into it a little bit because there are merits to both camps; though I feel like it is almost universally agreed that any filters that come in a camera or lens bundle should best be left unopened and away from your lenses.
Let’s be clear upfront: there will be no definitive answers here, nor any pixel-peeping sample photos of shots with and without filters. This is more about the types of filters and reasons to use them (or perhaps not). As with many of these posts, this is intended to be more informational/educational (with some opinions thrown in) than a simple “here’s the best and only way to do this.”
Finally, I’ll close with some recommendations of very good and excellent filters that I personally use.
One of the longest running debates on the Internet is the use of filtration – specifically UV (ultraviolet) filters. Some see UV filters as instruments of protection (of their lens) without any real consequences; others see them as sacrilegious pieces of inferior glass that compromise image quality. So, let’s get into it a little bit because there are merits to both camps; though I feel like it is almost universally agreed that any filters that come in a camera or lens bundle should best be left unopened and away from your lenses.
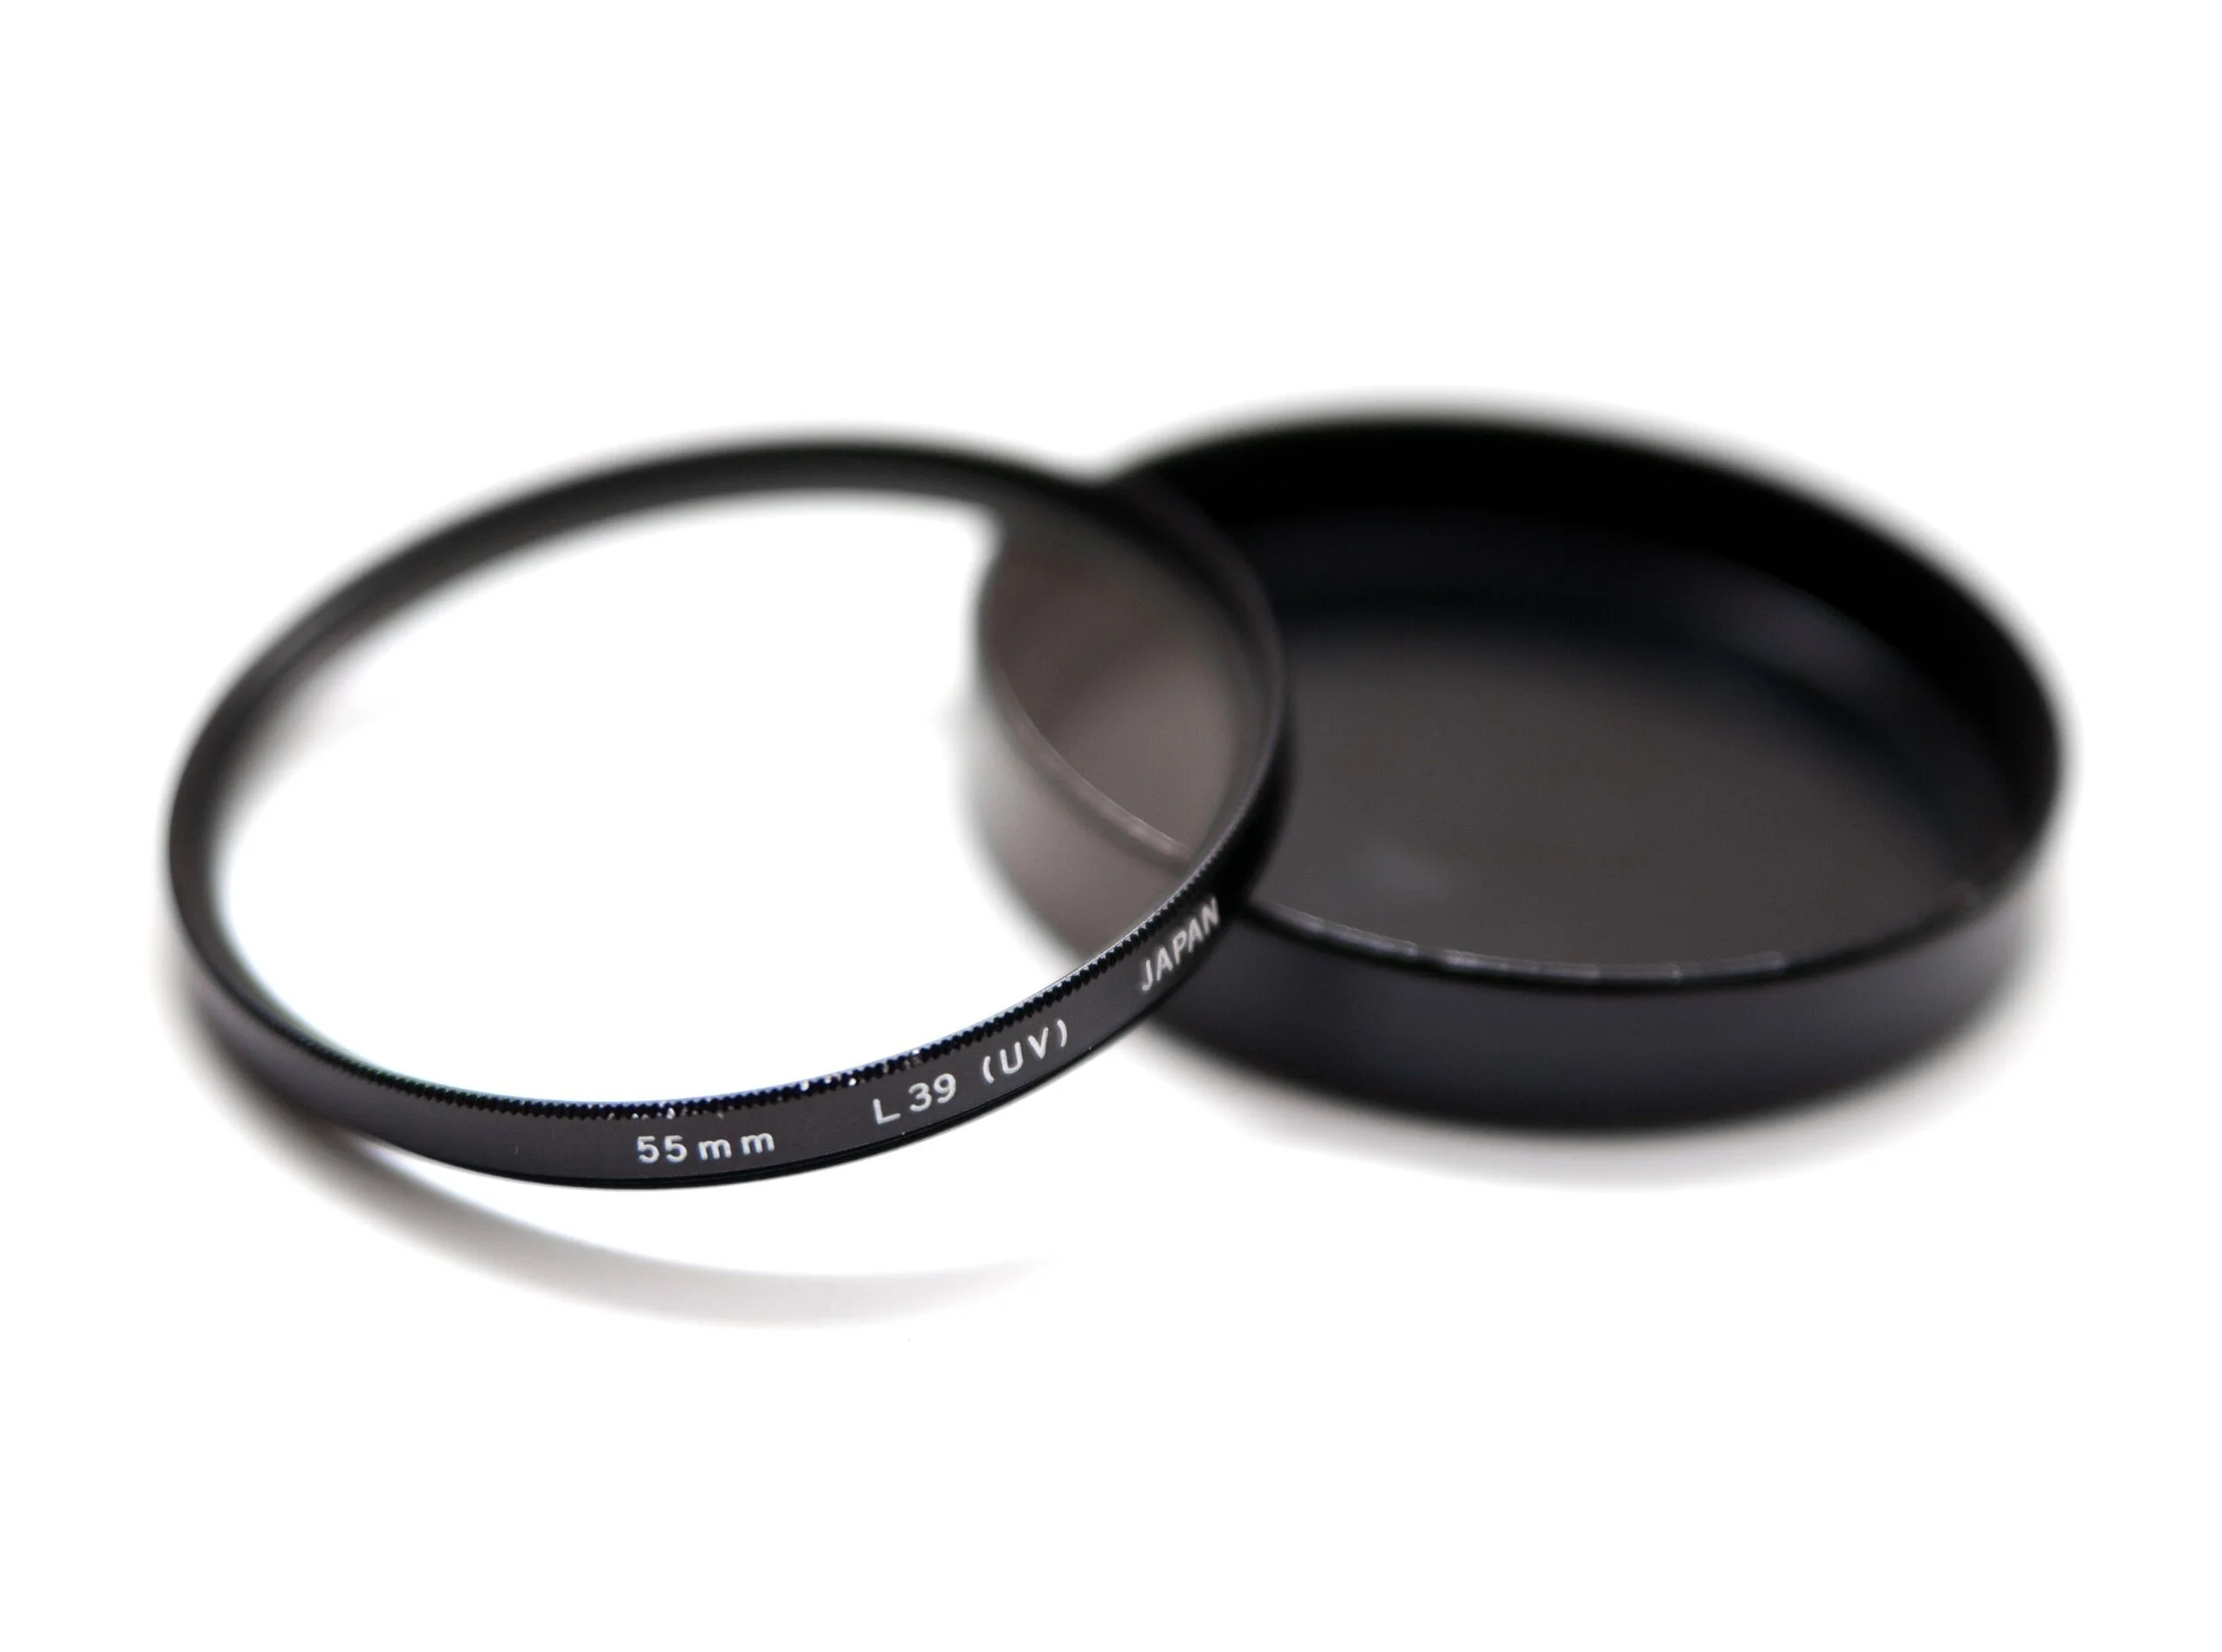
L39 UV Filter
Wikipedia Creative Commons License
What the hell is a UV filter? Good question. There’s a reason these filters aren’t just called “protection filters” or some such, even though that’s just about all they do (these days). First of all, we should denote the difference between a UV Filter and a UV Pass Filter because sometimes the former is used to describe the latter: a “UV filter” is nothing more than glass that filters/eliminates/blocks ultraviolet light from passing through into the lens and subsequently onto the sensor (or film). A “UV Pass Filter” is quite the opposite; it allows types of ultraviolet light through while blocking others. We’re talking specifically about UV Filters only.
Light presents itself in all manner of ways, many of which we cannot see. Ultraviolet light is one of those types that we cannot see – in fact, visible light is generally defined as landing somewhere between 400 and 700 nanometers. This happens to be the spectrum between ultraviolet (roughly 10-400 nm) and infrared (about 700nm up to something like 1400nm for near-infrared; other types have longer wavelengths). Below UV light we have x-rays, which can be as small as 0.01nm (aka 1 picometer), and gamma rays; above infrared we have microwaves and radio waves, among many others.
At any rate, there are many different types of light, but also many different types of ultraviolet light. So, in the olden days, film was particularly sensitive to ultraviolet light; most modern films fair just fine without filtration, though depending on the environment, color film can fall victim to hazing and overexposure in the blue layer (the blue layer is sensitive not only to blue light but also UV light). Most filters from the film days would filter out a specific threshold of light; an L39 UV filter (as seen above) was common among brands – its name indicating that it filtered out UV light below 390nm.
What about digital cameras? These days, many UV filters are nothing more than clear pieces of glass with some coatings – they don’t actually filter any light. Modern digital sensors now have UV (and IR) filtration in front of the sensor. This wasn’t always the case – many video cameras required the use of IR cut filters for a while, as did cameras like the Leica M8. Some people will actually have these filter stacks removed or replaced to allow their camera to capture a greater (or different) spectrum of light; I have a 720nm IR converted Sony a6000. Conversions can range from UV (to filter everything except ultraviolet light), 720nm IR (the most popular, as it makes for a nice balance of beautiful color photos as well as black and white), 590nm IR (best for color only), 850nm IR (best for b&w only), and even full-spectrum which allows the sensor to collect UV, visible, and IR light, though this type requires the use of lens-based filters to switch between whatever light you do/do not want to capture. Kolari Vision is famous for these modifications.
Long story short, unless you have an older digital camera that lacks filtration or you have a modified camera, a UV filter will not provide any image quality benefits. If you choose to use one, you’re using it as protection for your lens.
What are the downsides of filters? Well, there are many possible issues, with possibility nearing certainty if you use a cheap, poorly made filter. Issues can range from transmission loss (this is inevitable technically, but bad filters transmit even less), veiling flare, color cast, ghosting, decreased acuity, and/or vignetting. Many of these can become quickly apparent when used with wide angle lenses.
General Interference with optics. This can be due to a huge variety of reasons and the effects can manifest themselves in just as many different ways (some are described as you read on). But, to describe an example as simply as possible: consider a lens like the Nikkor AF-S 14-24/2.8G, or Tamron SP 15-30/2.8 G2, or Sigma 14/1.8; all of these are fast, wide-angle lenses with bulbous, convex front element. Now, think about putting a flat piece of glass over that (which you have to attach to lenses like these with a large 150mm square fixture due to that front element). It might change some things, right?* One of which is the way light hits and enters the front element (angle of incidence), of course altering the path of the light as it travels to the sensor in the process. In effect, you are changing the optical formula of the lens.
*Wide angle lenses are particularly susceptible to this – not just because of their large front elements and gargantuan filter holders, but also because they’re collecting light from such a huge field of view (and therefore from an absurd number of angles). This is precisely why a 14mm lens at f/2.8 only requires a pupil diameter of 5mm, whereas a 100mm lens at f/2.8 needs a 35.7mm pupil – they both gather the same amount of light, but the 100mm needs a much larger opening because it gathers light from a significantly smaller area.
Light loss. All glass has a certain level of transmittance* – light is reflected, scattered, and absorbed as it passes through glass. This is why we have both T-stops and F-stops and they are never the same, though the best lenses manage to get very close. Lens and filter manufacturers try to achieve transmission as near to 100% as possible through the use of specialized coatings and glass elements, but a true 100% transmission is purely theoretical.
*“Transmittance” and “transmission” are not the same. Transmission is the amount of light that passes through a material (glass in our case) – often expressed simply as a percentage. Transmittance is a measurement of the amount of light that the glass reflects, absorbs, or disperses. Ergo, transmittance is essentially the inverse of transmission; and thus, the higher the transmission, the lower the transmittance (and vice versa).
Ghosting. Filters can also cause light to bounce around internally in ways that it certainly isn’t meant to. For example, light entering the lens can bounce from the sensor, back off the rear of the filter, then once again back into camera – this can rear its head as ghosting due to the secondary “ghost” image it produces on the opposite side of the optical axis. This is particularly noticeable at night and/or wide open and can even happen without a filter attached at all if there are flaws in the lens’ optics. I learned the latter the hard way years ago when shooting a show with what was obviously a misaligned Sigma 18-35/1.8 – ghost images appeared in a handful of shots, many during the daytime and a few at night; some daytime shots had matte-box ND filters attached and night shots had no filtration at all yet still produced ghost images.
Acuity/Resolution Degradation. Any time you place a piece of glass in front of a lens, you run the risk of degrading the peak image quality (in this case, pixel acuity) that the lens is capable of achieving. This effect is more noticeable as you climb the ladder of sensor technology; what may appear to have no ill-effects on a 12MP sensor with an AA filter may well prove to be terrible on a 47MP AA-less camera. In the days of film, a decent filter would likely not noticeably degrade IQ – lenses weren’t as good, 35mm film resolved less detail than sensors of today, and grain would typically mask minor optical deficiencies. Plus, even UV filters actually had measurable benefits on film.
Color Cast/Vignetting. These are relatively simple to understand. There are a couple reasons a filter may introduce color cast:
1) If a filter is not spectrally neutral, it will have some sort of effect on the colors – fairly obvious.
2) Depending on the design of the lens and the filter being used, the optical formula of the lens may be compromised to the extent that you see the effects. Filters can imperil the telecentricity of the lens and therefore undermining its zero angle of incidence*; this in turn causes rays of light to strike the sensor at an angle non-parallel to the optical axis. The upshot of this is the potential for color crosstalk as the light interacts with the color-filter array.
*A lens with a zero angle of incident is purely a theoretical perfectly telecentric lens. I doubt any such lens truly exists. Lenses will have a non-zero angle of incidence by their nature, however this doesn’t change the aforementioned interactions.
3) When using an ND filter, there is a decreased amount of visible light passing into the lens, but infrared light is unaffected. Because of this, the ratio of infrared to visual light increases and can induce color casts.
A lot of side-by-side tests of filters – and this is certainly not exclusive to UV filters, in fact ND filters may be the worst offender here – will show how much a non-spectrally neutral filter can shift the color balance of the image. Obviously, this doesn’t pertain to filters whose intended purpose is to do that exactly that. Vignetting is less of an issue here as it is one of the least worrisome of optical deficiencies, at least in my opinion. However, we really don’t want a filter to introduce additional vignetting on top of what the lens inevitably already exhibits. This is mostly an issue with wider angle lenses and/or thick filters. My suggestion is to always get the thinnest filter – Formatt Hitech, for example, calls these “Superslim.” Step up rings to use a larger size filter than your lens thread size is another option – this also allows you to buy fewer filters but still use them across multiple lenses.
So should you use a UV filter? I don’t know. Up to you. Personally, I use them some of the time and not at all most of the time. I certainly don’t use them in any type of controlled environment such as product, portraiture, etc. I will use them in more volatile environments – dusty, sandy, otherwise dirty, anything where there’s a good chance of abrasive particles/materials hitting the front element. I’ve shot in machine shops where small pieces of wood/metal/sparks are flying everywhere and I’ll definitely have one on in that situation. As for general protection? Meh. The front element of a lens is much more durable than most people think and modern repellent coatings are quite good at making minor dust, rain, snow, etc. easy to clean. I find that a lens hood and of course the cap are more than enough to protect from accidental bumps or dings.
Filters other than UV. Okay, so let’s hop in to the other types of filters – at least a few of them. There are tons of types of filters (and subvariants within those types) and I won’t cover them all. Pretty much every downside covered above is equally applicable to non-UV filters, though some of those effects (e.g. light loss in the case of neutral density filters) are the very purpose of the filter. So, the big ones:
Neutral Density (ND) Filters
These are filters that cut the amount of light that enters the lens by an order of a specific magnitude – an ND 1.8 (aka ND64) filter cuts light by six stops, for example. Ideally, these filters do this with a neutral transmission, meaning they cut the amount of light but do not affect the color, tint, white balance, etc. In practice, this is often not the case, especially with cheaper filters. A bit of a color cast can be dealt with and is not the end of the world in most cases, as long as the cast is uniform across the frame, which it ought to be with a standard ND filter.
Water smoothing effect of a lower shutter speed
Wikimedia Commons
These filters are usually used to lower the exposure enough to shoot at a wider aperture in bright light or to shoot at very slow shutter speeds. An ND64 (six stops) filter is the difference between a 1/60th second exposure and a 1 second exposure; or the difference between 1 second and 1 minute. In the latter, you may get a small amount of motion blur from that one second exposure, but a full minute will give you a lot more. Photos of waterfalls or ocean waves that have a smooth, silky appearance are examples of long exposure photography likely taken with an ND filter. Without the filter, these photos would have been grossly overexposed.
There are also variable ND filters, where the “darkness” of the filter changes as you turn the filter ring, and graduated ND filters, where the filter fades with a gradient from lighter to dark (usually used to darken a sky while not affecting the lower portion of the image). Uniformity becomes a potentially more serious issue with variable ND filters – these use two polarizing elements to allow you to vary the density by turning the filter. Again, due to the high number of glass elements, a poor quality variable ND will probably have some significant negative impact. With filters you really do often get what you pay for.
Colored Filters (Red, Yellow, Orange, Blue, Green of varying intensities)
These are almost never used today; most digital sensors have made them irrelevant. Colored filters were typically used in the film era with black and white photography.* A red filter darkens skies and creates a more gritty aesthetic; yellow darkens blues to separate the sky from the clouds and renders pleasing skin-tones; orange sits in the middle of those two, of course; blue lightens skies and darkens skin tones; and green filters were often used for landscapes or anything with a lot of foliage – they would lighten the surrounding-greens to give a more natural feel.
*Colored filters (in the broadest definition of that term) were not limited to black and white photography. 80 and 82 series filters were often used to warm an image, particularly if you needed to tone down the blue of a daylight film (keep in mind, most photographic film was balanced for daylight, but cinema film had either daylight or tungsten options). 81 and 85 series filters would cool the image – used to tone down the effects of tungsten lighting, or the golden tones at sunset, or any number of other situations. With digital, well, we have white balance in camera and in post. Warming and cooling filters are also used by cinematographers to correct tungsten-balanced film (cinema film comes in tungsten and daylight flavors) in daylight or vice versa, as some directors/cinematographers like the look of a tungsten film with an 85 filter during daylight, for example.
The lone exception here are monochrome sensors. With Bayer – or X-Trans or Foveon – we have the wonderful advantage of channel mixers; basically, we have the ability to use a multitude of colored filters and precisely control their effect/strength. Monochrome sensors, naturally, lack that ability – they’re no different than b&w film in this way. So, if you have a Leica Monochrom, you may be well-served by investing in some colored filters, though you still will never have the latitude of a channel mixer from a CFA – filters are global and channel mixing allows for precise local adjustments.
Polarizing Filters
There are two types of polarizing filters – linear and circular – but we’re just concerned with circular polarizers, often abbreviated CPL. Linear polarizers wreak havoc on the autofocus and metering systems of DSLRs and don’t play nicely with AA filters, among other issues.

Polarizing filters are also helpful for landscapes (before/after)
Image by David Joyce, Creative Commons License
A CPL is a comprised of a linear polarization element plus a waveplate – the former polarizes the selected light linearly and the waveplate converts this into circularly polarized light. The effect changes as you rotate the filter and is most often used to cut the polarized light from skies, which enhances contrast, and to remove or reduce unwanted reflections off water, glass, or other reflective substances. The CPL must be adjusted appropriately for every scene and angle – what most effectively reduces reflections from one point of view likely will not with another.
The biggest disadvantage of (most) CPLs is that, due to their design, you cannot easily stack other filters on top of them – if you need to combine, say, an ND and CPL, the CPL might need to be attached last. It also makes the use of a variable ND more difficult, if not impossible, because of this; both filters must be rotated to achieve the proper setting. I try to avoid variable NDs in general (except for video work), because they can have poor cross-frame consistency issues, especially at the extreme end.
Along with ND filters, CPLs are probably the most valuable and useful filters you can get – though naturally it depends on the type of photography you do. CPLs would hardly be of use for in-studio fashion photography. But if you do any landscape or nature photography especially, I’d highly recommend investing in one; better to spend a lot of money on a high-quality filter at the largest size you need and use step-down rings than multiple cheap filters.
Other Filter Types
There are dozens upon dozens of filters that do all manner of things, some of them nothing more than toy effects. But here’s a quick rundown of the most commonly useful filters:
Diffusion: These are filters typically used to soften the sometimes harsh and biting resolution of digital photography, or more commonly, cinema. They can be useful for portraiture, though you can usually accomplish similar effects with more control in post. Video is the main use for diffusion filters.
IR (Infrared): These are used with modified full-spectrum sensors to block visible light (usually up to around 720nm) for infrared photography. With full-spectrum sensors, you must use various filters to block out the unwanted light. There are also IR cut filters (mentioned above).
Light Pollution: These have a number of names - my Haida Nanopro is called “Clear-Night”, NiSi calls theirs “Natural Light,” Schneider has “True Cut” - but all of them are designed with the same purpose: to block the light emitted by sodium vapor lamps, which we commonly know as basic street lights. These filters have a strong magenta/pinkish color cast, but work wonderful for astrophotography if you are anywhere near a city. I have only used the Haida square Clear Night filters, which are excellent.
Brands I Like (Please Use Sidebar Links!)
B + W
Breakthrough Photography
Formatt Hitech Firecrest
Gobe (budget option)
Haida
Heliopan
Zeiss
Ishimoto Blog:
Integer posuere erat a ante venenatis dapibus posuere velit aliquet. Fusce dapibus, tellus ac cursus commodo, tortor mauris condimentum nibh, ut fermentum massa justo sit amet risus.