
35mm Camera Recommendations (Part Two: Compacts)
Some people scoff at the idea of handing over in excess of five Franklins for a “point and shoot” camera – “you can pay half the price and get the same result!” Honestly, that’s almost certainly true. Few of these cameras will allow you to do more than a camera that costs $175; some functions may be easier to use, but most of the difference is in the higher-quality construction, design, and general aesthetics/haptics. A lot of the premium pricing of these cameras is also based on brand name, marketing upon release that advertised these as the best-of-the-best, comparative availability, etc.
As usual I recommend KEH or UsedPhotoPro for any of your used camera/lens/accessory needs - both always have plentiful 35mm (and other film) options available!
Continuing from where we left off here….
**For any non-product photos, i.e. the sample images taken with the various cameras discussed here, I have uploaded the original scans *without* modification or adjustments beyond cropping to 1:1 or other aspect ratios in a few cases. I would typically, like any photo, run these through Photoshop/ACR for all the normal color/tonal adjustments, but I want to give you an idea of how the variety of film stocks shown here appear “straight out of camera” - I’ve purposefully picked a number of different stocks, though I rarely shoot more than two or three of my personal favorites. Obviously, results will still vary depending on many factors, especially including your choice of development chemicals, dilution, temperature, agitation, duration, etc, etc.**
Bargain Compact (<$200)
Minox 35 GL/GT ($40-75)
These little guys are true gems. Possibly the smallest 35mm camera ever made (I believe that was their claim at the time) – others come close: Contax T, which is rangefinder coupled but also hundreds of dollars higher on the price tag, Olympus XA2, Lomo LC-A, etc. But none (even the Contax) approach the level of true love I have for them. The Minox 35 line is by no means perfect – the exposure control is limited, the film advance can often have issues (likely due to how tiny and cramped everything is), it’s zone focus only, the batteries are online-order only, and the leaf shutter is prone to failure. Then again, most compacts are for one reason or another… at some point. Thankfully you could get one of these for $50 (or less, depending on the model – GL is cheaper than GT).
No camera ever made is more deserving of the adjective “discreet” than these cameras. Zone focus only and the limited aperture-priority only metering system means you really only need to raise the camera to your eye for framing. The leaf shutter and manual film advance means you’ll never hear the camera in action outside of total dead silence. Here’s a photo I shot from the hip in a restaurant while going to the restroom (zone focused obviously, set to max f/2.8 aperture, estimated frame – you could do stuff like this all day long with someone standing right next to you and no one would know, let alone hear it).
Minox 35 GT, Kentmere 400 pushed one stop
Note on batteries: you can power the camera with four 1.5V Duracell 76A (aka LR44) or Energizer 357 batteries (all of these are the same) stacked together and wrapped in electrical tape (two 3V Duracell DL1/3N aka CR1/3N or Energizer 2L76 will work as well) – these are a lot easier and cheaper to find than the native 6V option, especially the four 1.5V option which almost every drugstore will carry. If you don’t want to deal with that, just buy the Exell S27PX battery from B&H or Amazon.
Alternative: Lomo LC-A or Olympus XA2
I won’t write too much about either of these because this will be way too long if I do.
Both are great options and you can’t go wrong. The Lomo LC-A – based on the design of the Cosina CX-2 - isn’t quite as small as the Minox, but it’s still pocketable. It features a fixed Minitar 32/2.8 leaf shutter lens and a zone focus system (0.8m, 1.5m, 3m, or infinity) which is controlled by a lever on the left side of the lens housing. Another lever on the opposite side controls the aperture – from f/2.8 to f/16 – along with an automatic mode marked by an A. The caveat to choosing your own aperture is you’re locked into a 1/60th shutter speed; in A mode, the camera can choose anything from 2 minutes to 1/500th.
Lomo LC-A (32mm Minitar)
There’s also a Lomo LC-W (wide) that sports a 17/4.5 Minigon lens. This is a newer model made in China, as opposed to the original which was produced in the Soviet Union/Russia (its production stretched from the mid 80s to the mid 90s). The LC-W can be purchased new from Lomography, but it’ll run you over $400.
Similarly, there’s a Lomo LC-A 120, a 6x6 medium format version with a 38/4.5 Minigon XL lens. Like the LC-W, it can be purchased new from Lomography for a sweet $449.
The Olympus XA2 is a very fine alternative to the Minox 35. It’s negligibly different in size or weight and features a 35/3.5 Olympus D. Zuiko leaf shutter lens capable of speeds from 2 seconds to 1/750th. Exposure is entirely automatic.
Like the Lomo, it’s a scale focus camera with three positions, marked by silly little symbols: a single person, two people, and a mountain. I don’t know the exact distances but I assume they represent approximately 1m, 3m, and infinity.
There are five Olympus XA models, all extremely different in both features and price. The Olympus XA (original model) will run you over $200 – it’s an aperture priority rangefinder with a 35/2.8 lens. The XA1 is a mechanical camera with a selenium meter surrounding the lens – this is probably the least desirable model, especially given the failure rate of older selenium cells. The XA3 is identical to the XA2 but with DX coding. And the XA4 is similar to the XA2 but with a 28mm “macro” lens (minimum focus is 0.3m, which is again zone focused).
For my money, the XA2 offers the best bang for your buck unless you want the wider 28mm lens of the XA4.
Mid-Range Compact ($200-500)
There are a lot of worthy candidates in this range. I’d argue you should probably aim for the $200-300 range – if you get up toward the higher end, you might as well spend a bit more and get a “premium compact” (read on). Not because your photos will necessarily be any better, or because price alone has anything to do with the quality or capabilities, but because those cameras retain their value very, very well. In fact, they’re most likely to appreciate in value. I remember when you could buy a Minolta TC-1 for $550 and it wasn’t that long ago. It was maybe three or four years ago that I sold a Yashica T4 for $300 or a Contax T2 for about $500, which was average market value for both at the time. To put that in perspective, that’s what “as is” Yashica T4’s are selling on eBay for right now. The cheapest Contax T2 currently listed is $780, from Japan.
Olympus XA, Kodak Ektar 100, cropped to 1.78
Japan always has the cheapest prices on these more expensive cameras – and in my experience with numerous purchases from numerous Japanese sellers, they are quick to ship and very accommodating if there is something wrong or if it’s not exactly as described – just make sure to read the description because their rating scale tends to start at EXC on up to EXC++++…. even if there’s fungus, haze, or operational issues. The few times I’ve had an issue, the sellers would offer to simply refund part of the purchase… very generously so I might add. I never hesitate to buy from Japan – just make sure they have solid feedback and like I said, thoroughly read the description and look at pictures.
My choices for this $200-500 range would be: Olympus XA, Rollei 35S or 35T, Konica Big Mini F, Ricoh GR1, GR1s and GR10 (the GR10 is a great option if you’re tight on funds, over the other two), Contax T, Yashica T3, and Minox 35 GT-X.
Of these, the Yashica T3 and Big Mini F are the least exciting, and probably not as likely to appreciate in value. I like the Yashica T3 over the T4 or T5 (aka T4 Super) – it’s uglier and a bit bulkier, but the lens is about a half stop faster (f/2.8 vs 3.5) and it has a rather neat “waist level finder” on top (it’s very very small and not something you’d regularly use, but it does come in handy occasionally). Also, they’re a good bit cheaper the T4/5.
Yashica T3, Ilford SFX 200.
My picks overall would be the Rollei 35S or T, Ricoh GR model, or the Contax T. The Minox 35 GT-X was one of the last models (late 90s vs. early 80s for the GL/GT). Compared to the GT, it’s a bit more stylish with lovely grippy material flanking each side on the front, it takes regular CR1/3N batteries, and has DX code reading. It also used the newer MC Minoxar lens (still 35/2.8) instead of the original Color Minotar – a lot of people seem to like the rendering of the Minotar over the Minoxar lenses. If you like the Minox 35 cameras, this is one of the premium options, but it’s not really worth paying 8-10x the price of the GT. Not that it isn’t a great camera and probably one of the few Minox 35 models that might appreciate in value, but it has stiff competition from….
A very similar camera to the Minox 35 line is the Contax T, which I do highly recommend. It’s only a bit larger than the Minox 35 bodies and once you see photos, you’ll instantly recognize a lot of their shared DNA. Like the Minox 35, it is an aperture-priority only camera with a hinged front lens cover. Most of the specs are incredibly similar if not identical. Biggest differences: it is a true rangefinder, meaning you can accurately focus through the viewfinder (no guess work unless you want to) and it sports a 38/2.8 Zeiss Sonnar lens vs. the 35/2.8 Color Minotar. Unlike its successor T2/T3 models, this one is as manual as it gets (aside from being aperture priority only) – none of the loud autofocus, whirring auto-film advance, program mode, etc. Which, like the Minox 35, makes it much smaller, quieter, and the epitome of discreet.
The Ricoh GR models are a design that pretty much exists to this day, currently in the Ricoh GR III digital camera. The GR digital cameras have gone through seven different iterations over the years, three of which (GR, GRII, GRIII) sport APS-C size sensors. And there’s a great reason Ricoh chose to keep the basic form factor: it’s one of the finest pieces of ergonomics design in history.
The GR1s is the successor model to the GR1 – only notable differences are an illuminated LCD display, ability to use Ricoh lens filters, and a couple additional coatings to the lens.
Rollei 35TE - not the model I’d recommend, but the only one I have a photo of.
The Rollei 35 line, which offers a multitude of different models, has a very strange design with all of the controls - aside from the film advance - relocated to the front of the camera and sports a lens that you manually retract and collapse. Oddly and often confusing to many at first, you must advance the film to the next frame before you can collapse the lens - the camera will literally not allow you to do so otherwise. But this way, it’s completely ready to go once you pop the lens out next time.
The Rollei 35 (original model, no letter, just “35”) was first produced in Germany and later moved to Singapore. Both sport the same 40mm f/3.5 Tessar lens designed by Zeiss. The Made in Germany models say “Carl Zeiss” on the rim of the lens, while the Singapore models read “Made by Rollei.” This can be a bit misleading – the lens was indeed made, as in produced and assembled, by Rollei, but it is still the exact same lens that Zeiss originally designed. This happens all the time today; Hasselblad XCD lenses are made (not designed – same as the Rollei 35 situation) by Nittoh in Japan, many Pentax lenses are made by Tamron (though I think a lot of those are also Tamron designs), Leica TL lenses are made by Panasonic (and maybe some of their full-frame L mount lenses).
So, the upshot? There’s no difference between a Made in Germany Rollei 35 and a Made in Singapore Rollei 35. Yet, you can get the latter for ~$175 (I just bought one for $170 due to writing this article) while the former will run you ~$225-275. This was exceedingly common with cameras and lenses in the film era – Made in Germany Leica lenses fetch more compared to Made in Canada (or, nowadays, Portugal) despite being identical beyond those three words on the barrel.
The 35, 35S, and 35T are the best options.
Premium Compact ($500+)
Some people scoff at the idea of handing over in excess of five Franklins for a “point and shoot” camera – “you can pay half the price and get the same result!” Honestly, that’s almost certainly true. Few of these cameras will allow you to do more than a camera that costs $175; some functions may be easier to use, but most of the difference is in the higher-quality construction, design, and general aesthetics/haptics. A lot of the premium pricing of these cameras is also based on brand name, marketing upon release that advertised these as the best-of-the-best, comparative availability, etc.
The excessive premium of decidedly average cameras also just comes down to a bizarre course-correction in the market; consumers creating demand for a previously average product, followed by word-of-mouth which then drives up desirability, leading to a ballooning of prices. The best example would be the Olympus mju-ii aka Olympus Stylus Epic. This was the highest-end model in Olympus’s budget point-and-shoot line of cameras, which included both fixed prime lens models and a number of zooms. It’s about as barebones and basic as you get; all plastic construction, basically no physical controls (I think it has TWO buttons on it, one for flash control and one for timer) – the lack of controls translates into lack of functions; spot-meter only, AF only, Program mode only, no DX override or exposure compensation, etc. You could absolutely not get a more basic camera. Yet they routinely sell for over $300! You could land a Konica Big Mini F or Rollei 35s for less than that – not to mention many other fantastic cameras – for the same or lower!
Konica Big F Mini, Portra 160, cropped to 1.78.
People like to talk about how great the lens on so-and-so is. “The Summarit 40mm lens on the Leica Minilux is as sharp as a lens gets!” Nonsense like that.
Here’s the reality. Of course the lenses in compact 35mm cameras vary (often greatly) in quality, but there comes a point where you’ll simply never notice the difference. This can certainly be true of modern lenses made for digital cameras, but it is especially true when shooting film – 35mm is only capable of resolving somewhere around 20MP at best.**
**There is no wholly accurate way to measure resolving power of film compared to digital resolution. I have, however, read the report from the most comprehensive and scientifically sound (that I’m aware of) research project on the topic. To keep it short, film itself is capable of resolving up to around 160MP, but that’s only theoretical as it doesn’t include the lens in the equation. With an excellent, high-resolving optic, a fine-grain black and white film can potentially resolve 22MP (Fuji Neopan 100). Fuji Velvia 50 (slide film resolves finer detail vs. color negative, typically) is capable of about 16MP. These are under ideal conditions with an excellent lens, focus, exposure, development, scanning, etc.
You can scan film at whatever resolution you want. A $300 flatbed scanner will allow you to scan at ridiculous multi-hundred-megapixel resolutions. But that’s meaningless since most of that is just grain – not any actual detail. There are other issues as well – if scanning with a digital camera, what’s the quality of the lens? Does the sensor have an AA filter? Did you get the focus spot on? Is the camera (sensor) perfectly planar to the film or is it tilted slightly? On and on.
Fujifilm Klasse, Kodak Ektar 100
At any rate, the list of high-caliber, worthwhile, collectible compacts worth buying is long. And unlike some of the others, I have a hard time here picking one or two firm suggestions – all of them have something to offer that the others don’t (except one high-end brand I’ll cover shortly), and you can’t really go wrong with any of them. Also, $500 and up is a big range – some of these you can get very near $500 and at least one is nearer to $1500.
So, my choices: Leica Minilux (reluctantly), Contax T2/T3, Minolta TC-1, Nikon 28/35Ti, Konica Hexar AF, Ricoh GR21/GR1v, and the Fujifilm Klasse/Rollei AF35M.
Leica Minilux
It’s fine. Terrible viewfinder, unless you want to experience the thrill of something seemingly designed to replicate the experience of looking through a drinking straw (0.35x magnification). Compare that to the Nikon 35Ti or Contax T3, which are 0.5x magnification. A lot of compacts have small, abysmal viewfinders (some don’t), but given its size and premium Leica-cost, it should be much, much better.
Its star quality is the doubtlessly phenomenal 40/2.4 Summarit lens. But the reality here? Most of these other cameras have lenses that are as good and possibly better in the case of a few of them.
The rest of the camera is fairly average – I like the combined focus/aperture dial; some cameras only have menu-driven manual focus, which is… fiddly and just pointless most of the time. And it’s nice to be able to set a hyperfocal distance and shoot quickly without waiting for the whirring autofocus motor to latch on. The shutter in the Leica tops out at 1/400 (vs. most others at 1/500 or the Minolta TC-1 at 1/750, which is rare). It’s a nice camera without a doubt, but I really do hate that viewfinder.
Leica Minilux. Most are champagne, but there are black variants available - but they’ll cost you.
It may seem like I don’t care for it and that’s pretty true. But I mentioned it for one main reason:
The Minilux is a bit notorious for the dreaded E02 – an inevitable error code for this camera caused by wear on a lens flex-cable. It’s not really a caused for concern in reality: almost all of these cameras will inevitably fail. All of these premium options are fully electronic pieces of technology going on two to three decades old.
I know… that certainly doesn’t seem like a reason to mention the camera here. But, here’s how I look at it: I would actually be more comfortable with a Minilux in terms of failure issues than a lot of these others. Why? Because 1) given the notorious nature of the E02 error, there are a number of places that still repair them, for reasonable prices to boot – I cannot say the same for any of the other cameras* and 2) self-conversion kits for the lens exist, though doing a quick search shows that MGR Production (who produced the Minilux conversion adapter I knew of) has seemed to have vanished – their website is down and their last Facebook post was March 2018, in which they were working on a Contax T3 lens conversion adapter. I will continue to research (or maybe they’ll respond to me FB message?).
*This actually isn’t quite true. The easiest and most reliable cameras to get repaired, in the United States at least, are the Contax T2 and T3 (and possibly the TVS series), which are the only point and shoot cameras that Nippon Photoclinic (located in NYC) still services. I can personally vouch for them (not that they need it, they have a sterling reputation); they do quality work at reasonable prices with very quick turn-around and offer free, no-commitment estimates (you pay return shipping, obviously). They also work on many other 35mm, medium and large format cameras as well as lenses and are the authorized North American service center for Contax, Linhof, and Wista cameras AND lenses. But they service Bronica, Hasselblad, Nikon, Zeiss, Leica, Rolleiflex, many many more. I’ve personally had them repair several Contax G2 bodies. Find them here: http://nipponphotoclinic.com/services/
As for the Minilux, user “vintageandphoto” on eBay in the Ukraine, offers E02/E01 repair for Minilux cameras for $145 (plus your shipping cost to send it in). I’ve read nothing but great reviews across forums about him. He also fixes T2, TVS, and TVS II cameras for $130. You can also easily find many lists for a new flex cable on eBay if you’re brave and want to do it yourself. So, while the Contax cameras may be “easier” via Nippon, you’ll definitely be spending more than ~$160 (once you include shipping to the Ukraine) than you would for the Minilux.
Leica Minilux. Kodak Portra 160, cropped to square
It’s worth noting that all or almost all of these cameras can have their lenses converted to Leica M mount (with coupling) by Miyazaki san of MS-Optical fame. I’ve been in touch about having the 35/2 Hexanon from a dead Konica Hexar AF I’ve had sitting around for a few years converted – a rough estimate at the time was in the $600-700 neighborhood, but don’t quote me on that. Miyazaki san also converts non-compact lens to M-mount: Contax G 28/35/45/90mm lenses, for example, are quite popular.
**Apparently, I should have done my double-checked before posting this; Miyazaki san no longer offers conversions. However, Skyllaney Opto-Mechanics in the UK does M-mount conversions, but as far as I know, only for lenses with built-in helicoids. They do tons of Contax Zeiss, Pentax, Nikon AI, Canon FD, Minolta MD, and maybe M39 (rangefinder) lenses, though they say SLR lenses are the most cost effective. (https://skyllaney.com/services/).
Ricoh GR1v or GR21
I already wrote fairly extensive about the Ricoh GR cameras above. These are the “top” models – “top” simply meaning “most expensive” in this case. Just pick whichever is suited for your needs.
The GR1v was the GR1s replacement and offered several new features: DX override (you can just set the ASA yourself), auto bracketing mode, and the ability to add presets to manual focus mode (1m, 2m, 3m, 5m, and infinity). Everything else remains the same.

Ricoh GR1s. Ilford FP4+ pushed one stop.
FP4+ pushed about a stop is one of my favorite choices for a gritty, grainy, vintage look. Many of the images from that combo look like they could have been taken from a 1950s newspaper.
The GR21 is a completely different camera than any of the others, at least in some major ways. It’s also by far the most expensive (cheapest currently on eBay is $1099 OBO – next cheapest is $1440). It’s very similar to the GR1 but instead of a 28/2.8 it has a 21mm (surprise, I know) f/3.5 lens with 9 elements in 6 groups. If you want a very high-quality 35mm compact camera with a 21mm lens, this is your only option. You need it or you don’t. Value will probably do nothing but continue upward.
Minolta TC-1
One of my favorites. I’ve been looking at a few lately after I came across one on KEH the other day. These are one of the smaller premium point & shoots – shockingly, it’s smaller than any of the other cameras (I mean shirt pocket tiny). The GR appears to be a bit thinner with the lenses retracted on both, but the TC-1 is thinner once the lenses are extended – there’s not much in it either way. Despite the use of titanium in the TC-1, both it and the Ricoh feel about the same weight – however the TC-1 feels more robust and solid. The Ricoh is much quieter to focus – actually quieter than any of the cameras, save the Hexar AF.
The TC-1 is a masterpiece of design. It sports a rather unusual 28/3.5 G-Rokkor lens that is unrivaled in quality, but oddly has a four-step (in approximately one-stop increments) bladeless aperture. Bladeless aperture, you say? Instead of a variable diaphragm, it uses a disc with three perfectly circular holes (plus wide open). This limits it to f/3.5, f/5.6, f/8, and f/16 only – but do you really need anything more? This lens was actually sold in limited quantities with rangefinder coupling and an M mount – same is true of the Ricoh GR, though that one had an LTM mount.
Minolta TC-1, Rollei Retro 80s
The camera is aperture-priority only, which is controlled by a rather odd (and hard to describe – just see the photo) notched “slider” that moves back and forward to click into spot at your desired aperture.
On the top is a basic control dial that moves between function settings, e.g. ISO (offering DX override), AF or Manual focus, flash, exposure comp, etc. Thankfully, unlike some compacts, flash setting is retained when you cycle the power, so you don’t have to constantly turn the flash off every time you turn the camera on.
Shutter speeds range from 1/750 (pretty impressive compared to others) to 8 seconds. You have to get used to the LED shutter speed readout in the viewfinder – it doesn’t display the precise SS, but rather a range. For example, 500 and 125 may be illuminated and this indicates the SS is somewhere between 1/350 and 1/180. Or if just 125 is illuminated, SS is between 1/180 and 1/90. Not exactly logical and honestly a pretty poor design; I’d love to know the reasoning behind this choice.
A very, very worthy option.
Contax T2/T3
If you’re looking for a camera to use and enjoy with an excellent lens that will also definitely appreciate in value, look at these two. I’m still kicking myself for selling that T2 a few years back for $500. Why did I? Well, it’s just not my favorite camera.
Contax T2, Ilford XP2 Super 400
It’s got everything you want. Great build quality, and amazing 38/2.8 Sonnar lens, a nice little grip on the front, nice viewfinder. But it just didn’t excite me much, which wasn’t helped by its larger size. It’s big compared to, for example, the Ricoh GR’s, Minolta TC-1, or its successor – the Contax T3.
The T3 is a much nicer camera, in my opinion. If your budget more than covers a T2 but not quite a T3, either bite the bullet or save up a bit longer and get the T3. It’ll appreciate in value more than probably any other compact and it actually is a wonderful camera.
Contax T3 (cropped in slightly); Kodak Tri-X 400
Compared to the T2, the T3 changes may seem trivial to some, but they really impact the way the camera feels and works with you – which, to me, is incredibly important for any camera, but especially small, discreet, fast cameras like these. The T3 is quite a bit smaller than the T2; it has a redesigned layout on top; it has a newly designed 35/2.8 Sonnar (vs. the 38/2.8 of the T2); and it focuses down to 35cm (13.8”) instead of the 70cm (28.6”) of the T2 – a considerable difference.
Konica Hexar AF & Nikon 28/35Ti
I’m including two options here because they are both exceptional, about the same price, yet one or the other may suite your personal preferences over the other.
There are a lot of options when it comes to premium compacts and plenty of other articles written about them. I absolutely love the Nikon Ti series (in either 28mm or 35mm flavors): they’re fitted with absolutely fantastic lenses and the – at first odd and potentially off-putting – clock-like dials on top are actually one of my favorite points of design in any camera. No other AF compacts allow you to see your aperture, exposure compensation, focus distance, and number of exposures remaining all centralized in a single panel. The Konica Hexar AF displays all of this info externally as well, but not in a single location nor as stylishly. I should note that almost every other compact will display some/most of these settings in the viewfinder only; the Nikons and Hexar are particular exceptions.
My personal choice favorite of the two is the Hexar AF because it’s the only autofocus, auto-advance compact that is quiet enough (incredibly quiet in this case) for me to describe it as fully inconspicuous thanks to its “stealth mode.” The Nikons, the Minolta TC-1 (another personal favorite), the Contax T2/T3 – all are fantastic cameras with top notch optics, but stripped of discretion by their loud, whirring film advance and focus motors.
Konica Hexar AF, Kodak Portra 400
The Hexar AF is larger than others due to its significantly larger and utterly fantastic lens, but none of these cameras (sans Ricoh GR series) will comfortably fit in a jean pocket or shirt pocket. Once you step over that line, the difference (to me) is minimal – all of them will do just fine in a jacket pocket or dangling from a wrist or neck strap. The Hexar is still undeniably larger, however I’d guess the weight is similar to the others because of their titanium-bodied construction.
The Hexar also excels in a number of other ways due to its larger construction: there’s actually a slight grip rather than the flat fronted, boxy designs of the others and the viewfinder is of significantly higher magnification – closer to an ILC rangefinder than a compact. Many of the compacts have fairly abysmal viewfinders – an inherent trade-off in return for their diminutive size.
Of course, if size is a priority, the 28/35Ti cameras, with their fully retractable lenses, are going to win out (and the Minolta TC-1 is even smaller). You absolutely won’t lose anything to the Hexar in terms of sheer image quality, though the lens is a stop slower. However, there’s one notable advantage in favor of the Nikons: matrix metering.
First introduced in the Nikon FA and later the F4, Nikon created the first version of what is today the most commonly used exposure mode. Other cameras of the time had spot or center-weighted metering, which can easily be fooled by strong point sources or particularly dark luminance areas. Matrix metering (aka evaluative, aka multi) splits the scene into quadrants, uses a microprocessor to analyze it, compares it to similar scenes from its library of computer knowledge, and choose an exposure based on what it believes is best for that scenario. Taken for granted today, it was incredibly remarkable technology – though not foolproof – when first introduced and only improved over time. By the 90s, when the Ti compacts were introduced, the technology had been significantly refined.
Nikon 35Ti top panel display
It’s hard to go wrong with either of these choices; the Nikons present in a more conventional 35mm compact design, while the Hexar takes on a form more akin to a Contax G with the 35 Planar attached. Unsurprisingly, this is what it was marketed as an alternative to. I find the Hexar more comfortable, pleasant, and discreet to use, but your mileage may vary.
Lastly, we have the Fujifilm Klasse – also available as a Rollei AFM35 – which is a lesser known, though still incredible, compact fitted with a 38mm f/2.6 Fujinon lens, program or aperture AE, auto DX coding, and manual focus via a dial on the front alongside the lens. The Klasse was also available in two other variants – the Klasse S, which is essentially the same with minor upgrades here and there, and the Klasse W which sports a 28mm f/2.8 lens instead of the 38mm.
The Klasse (or Rollei AFM35) is an excellent option particularly if you want something a bit longer… closer to a 40mm. Resale value and desirability isn’t as high as some of the other options, so this one is less likely to appreciate considerably. But that’s not the primary goal in buying any of these cameras anyway.
Zoom
Lastly, we have my lone recommendation for a compact 35mm zoom camera. Most of these cameras tend to be consumer-oriented, both in price and feature set. Read into that as you will. Some of those are actually pretty good – the Olympus Stylus Infinity Zoom cameras are great, though with limited user controls and middling build quality.
My pick(s) are the Contax TVS models: there are three and all have their place depending on your desired features and especially budget.
*The TVS will run you about $250-325, TVS II $450-600, TVS III $600-825.
The first, just known as the Contax TVS, is the cheapest. It’s fitted with a 28-56/3.5-6.5 Vario Sonnar lens, whose zoom control is operated by a knurled ring/knob encircling the lens base, and the aperture is controlled by a separate knurled ring just above this. Like most compacts, its either program AE (flip the aperture ring to A) or aperture priority (set the ring to your desired aperture). Like the Contax T2/T3, focus can be manually controlled by a thumb dial on the top.
Biggest issue with the TVS: no lens cap. The lens doesn’t fully retract into the body like the T2/T3 and your only option is to buy a threaded lens cap (I forget what diameter… I want to say 30.5mm). A similarly sized pinch-cap may work – which would be nice for quicker deployment, but I feel like there’s a reason I had to buy a threaded cap.
Contax TVS, Kodak Portra 400
The TVS II is very similar in almost all but a few respects: the viewfinder has been significantly modified – unfortunately I don’t quite remember exactly how, but I do recall it being brighter than the TVS and displaying shooting info in a more logical and cleaner manner. The knurled zooming ring and knob around the lens base have been removed and you now zoom simply by turning the lens. It’s worth noting you could also do this on the TVS, but I always liked the ring/knob as it basically guaranteed your hand wouldn’t interfere in the viewfinder. Lastly, there was now an automatic lens cap that opens/closes when you extend the lens.
The TVS III is an entirely different design from the other two. Now sporting a 30-60/3.7-6.7 Vario Sonnar lens that extends from/collapses into the body when you open or close the hinged door – much like the Minox 35 cameras, or the Contax T (which is what the TVS III design is based on).
Other major changes include removal of the aperture dial, which is now controlled electronically by two arrows (up/down) on the front face of the camera body. Likewise, the zoom is also electronically controlled. Unlike the other two models, this is NOT stepless – there are variable stops of 30, 37.5, 45, 52.5, and 60mm. Essentially like a set of five prime lenses (this actually was not uncommon with many film-era fixed lens zooms). The camera is also a good bit smaller than the TVS or TVS II.
I personally like the TVS III the most of the bunch – I don’t love the idea of electronically controlled aperture or zoom, but in practice it’s actually very nice… you can do everything (zoom, change aperture, take photo) with your right hand only now. The folding design is a tried and true favorite of mine and the smaller size is certainly welcome. And lastly, the stepped zoom isn’t a bother to me at all. Hell, most of these viewfinders may only show 80-85% of the frame – under 90% wasn’t uncommon even for top-of-the-line SLRs. Plus, with five stops from 30 to 60mm, you can easily adjust your frame with a few steps in either direction.
As usual I recommend KEH or UsedPhotoPro for any of your used camera/lens/accessory needs - both always have plentiful 35mm (and other film) options available!
35mm Camera Recommendations (Part One: SLR & Rangefinders)
Film has experienced a bit of a resurgence in the past five or so years. We’ve seen a proliferation of never-before-made film stocks and even some of the ones killed off have been brought back to life (Fujifilm Acros 100 – my favorite b&w stock). As a life-long avid shooter of film, from 35mm to 4x5, and experience with thousands of camera models, I thought I’d do a post on my own suggestions…….
Film has experienced a bit of a resurgence in the past five or so years. We’ve seen a proliferation of never-before-made film stocks and even some of the ones killed off have been brought back to life (Fujifilm Acros 100 – my favorite b&w stock). As a life-long avid shooter of film, from 35mm to 4x5, and experience with thousands of camera models, I thought I’d do a post on my own suggestions – from sub-$100 bargains to collectible, premium offerings.
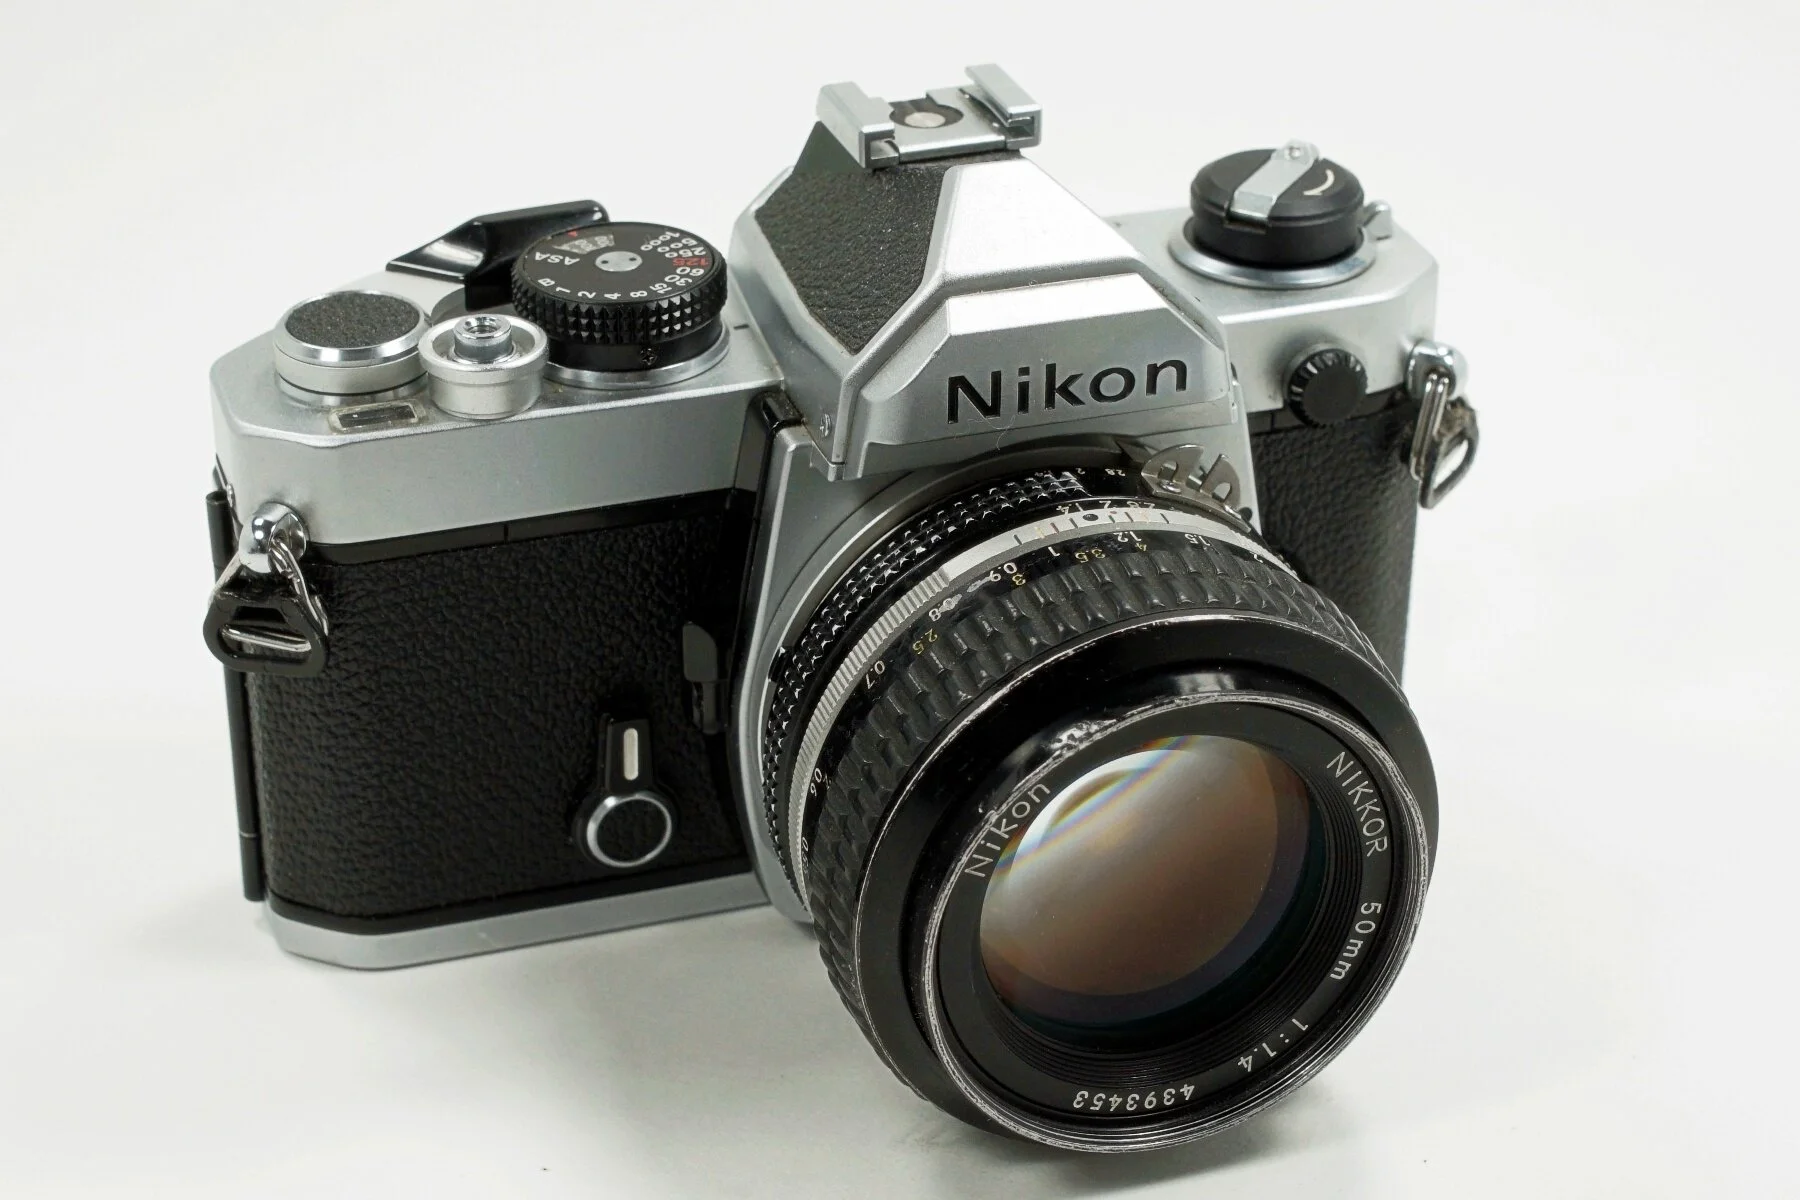
Nikon FM w/ Nikkor 50/1.4 AI-S
Each pick is only that – my choice based on user experience and, naturally, my personal preferences. There are obviously dozens, if not hundreds, of other options that others may prefer. None of my picks are meant to imply that others are inferior; so, before you ask “what about [so and so]??” please keep in mind that I guarantee I already considered it, I probably love the camera, and simply prefer whatever I chose instead. Though I will say almost all of these are limited to manual focus cameras only. Maybe I’ll do a later article on autofocus 35mm cameras, because there are plenty of truly great ones (Nikon F100, Pentax MZ-S, Canon EOS-1, Minolta Maxxum 9 (a-9), Nikon F4/F5, etc, etc).
I will do further articles on 35mm compacts and medium-format options, as well. This one is limited to 35mm interchangeable lens cameras.
(Pictures are from cameras/lenses I’ve had in my possession - often quite briefly - over the years, so the quality is not great)
Ultra-Bargain (<$75 w/ lens)
Yashica FX-103 Program
This is actually one of my favorite hidden gems of the film world and can routinely be found with a Yashica 50mm lens for $50-75. It uses the Contax Yashica (C/Y for short) bayonet mount, which means it can utilize all of the extremely excellent Contax Zeiss lenses, many of which are still incredibly good even on high-resolution digital cameras. In fact, many of the lenses were so good that some of their designs exist to this day in the Zeiss Milvus series.
Contax themselves produced a number of great 35mm bodies, many with some incredibly advanced features (the Contax AX can autofocus with manual focus lenses). However, a lot of these are motor-wound (meaning no film advance lever) and most have reversed controls with the shutter speed dial on the left-hand side. I tend to prefer the simplicity and tactility of a manual advance lever and traditionally placed shutter speed dial.
The FX-103 Program has four modes: P (Program), HP (High Speed Program), A (Aperture Priority), and M (Manual). That’s far more than most cameras in this price range, plus it has an unusually extensive ASA range from 12 to 3200. There really isn’t anything to complain about here.
Bargain ($100-175)
Minolta X-570 or X-700
There are a number of great options I considered here; Nikon FE, Nikon FM, Pentax K2 or MX, but ultimately settled on the Minoltas because the X-570 was one of my first cameras and they’re powerhouses – loaded with features, and compared to the Nikons or Pentaxes, the glass is a good deal more affordable. The X-700 has Program and Aperture Priority, and Manual modes; the X-570 lacks Program, which is honestly not a mode I ever use with 35mm cameras anyway. Otherwise, the bodies and features are nearly identical.
There are a plethora of great Minolta lenses available at very reasonable prices; there is also the renowned 58/1.2 Rokkor which is a nice chunk of glass that produces lovely, dreamy images wide-open. Even that lens can be found at fairly decent prices. Your regular 50/1.8 or 50/1.7 lenses are dirt cheap and 50/1.4 or 55/1.4 lenses are incredibly affordable as well.
Make sure to check compatibility between lens type (MD vs MC) if you intend to use the X-700’s program auto mode (MC lenses are aperture priority or manual only).
Nikon FA
In the 1970s and early 80s, Nikon made a number of exceptional “mid-range” models – that is to say, they were designed to be a step down from the top-end Nikon F2/F3 variants. But, they proved highly reliable, durable, and a bit more compact – so they found a huge home with photographers of all kinds. These models included the Nikon FE, FE2, FM, FM2, and the ahead-of-its-time Nikon FA. Introduced the year after the FM2 and the same year as the FE2, it was positioned as an advanced amateur body. Yet, one feature in particular – its multi-segmented exposure meter – was the first of its kind. Today it’s better known as matrix metering (Nikon), evaluative (Canon), multi (Fujifilm & Sony), etc. It’s a now-commonplace metering mode that utilizes a microprocessor to analyze a scene and select the appropriate exposure.
Nikon FA w/ Motor Drive
The FA also offered four exposure modes – Manual, Aperture Priority, Shutter Priority, and Program Auto. This was, again, a first for a Nikon camera until 1988’s Nikon F4.
Lastly, the FA could mount AI, AI-S, AI-P, and non-AI lenses (though the latter would not be able to make use of all exposure modes). I believe it was the last body with the ability to accept non-AI lenses until the FM3A many years later.
Today, excellent copies can be found for $100-130, easily. It’s a steal.
Mid-Range ($200-500)
There are tons of amazing options in this range and I could do a list of 30 of them. But I’ve picked five favorites of mine from five completely different line-ups.
Nikon F3 / F3HP
The Nikon F3 is one of the finest cameras ever camera – by anyone. It is nothing short of perfect; rock-solid build, amazing ergonomics, and one of the most dependable cameras I’ve come across.
The F3 is, of course, the successor to the legendary Nikon F2, but this time with a built-in light meter (no clunky finder necessary) and aperture-priority automation. Like Nikon’s FE/FE2/FA models, the F3 has an electronically controlled shutter, so it will not function without batteries (though on a personal note, in my experience with thousands of cameras, the longevity and reliability of mechanical and electronic cameras is no different – do not be concerned about it, at all).
Its successor – the F4 – was a revolutionary camera and well-worth owning if you need autofocus, but me? I like manual focusing on the nice, bright, beautiful matte screen, and – while it may seem minor – I like a thumb-operated film advance as opposed to automatic motor winders found in the F4 and all later autofocus cameras.
The F3HP is simply the F3 with a high eye-point finder (very nice for those of us who wear glasses). Since the finders are interchangeable, a regular F3 can become an F3HP by swapping in the DE-3 finder, and an F3HP can use one of the many other finders available – including the basic DE-2 finder. There’s even a (very cool) waist level finder available (DW-3). Focusing screens are also easily interchangeable.
Minolta XK (aka XM, aka X-1)
I have a fair number of cameras that I came across or fixed and then sold, now wishing I hadn’t. The Minolta XK would rank up there quite high, along with the Contax S2 described below.
Quite simply, this thing is an almost brick. It may be the most solidly built 35mm camera ever made. With the AE prism (includes aperture-priority) finder attached, it is a hulking beast with tall shutter speed and ISO dials (not unlike the Nikon F2 with Photomic Finder, except larger). With the plain and unmetered P-finder, the camera has a much sleeker design (again, not unlike the Nikon F2 with the unmetered DE-1. Like the F3, a waist level finder is also available.
With eleven interchangeable focus screens, a horizontally traveling titanium shutter, and a beyond impressive brass construction, this is one of the finest cameras of its time. Lenses are also excellent in quality and now low in price compared to glass from Olympus, Nikon, Pentax, and others.
Contax S2
The Contax S2 is on the higher-end of the price spectrum compared to some of these others, depending on condition and where you buy from (KEH currently has one for $542; I have seen some from Japan for $400).
This is one of the last Contax C/Y bodies released – done so to commemorate the 60th anniversary of Contax cameras (some bodies even have “60 Years” emblazoned on the front – naturally they fetch a higher price tag.
The S2 (and later, the S2b) are actually rather simple cameras. Mechanical shutter, no auto-exposure modes, and a simple spot-meter (unusual at the same) powered by two LR44 batteries. It’s as basic in operation as a Pentax K1000 or Nikon FM.
The beauty, I suppose, lies in this simplicity. Unlike previous Contax bodies, which swung for the technological fences, the S2 was as minimalist as it gets – and I actually quite like the spot-only meter. And, unlike prior bodies, the design is more akin to the standard orientation of Nikon, Pentax, Canon, etc. bodies: shutter speed dial on the right, ASA dial/exposure compensation on the left, manual film advance lever. The main reason I preferred Yashica bodies over Contax was due to their reverse shutter/ASA dial positioning and (often) motor-driven film advance. The S2/S2b is none of this.
It pairs particularly well with the phenomenal Contax Zeiss 45/2.8 Tessar.
The S2b uses a center-weighted meter and is available in a lovely graphite finish. Otherwise, the two are identical.
Contax G1 (Green Label)
Contax – again pioneering some of the most innovative technology – surprised the camera world in 1994 when they released an autofocus rangefinder. That camera was the G1: a titanium-clad body with electronically controlled exposure, autofocus, and rangefinder system. Lenses are screw-driven via an in-body motor that turns a pin on the lens mount, forcing the helicoid back and forth.
Unlike every other rangefinder camera to that point (and since then), the viewfinder field-of-view changes depending on the lens being used. That is to say, instead of relying on a small box in the middle of the frame for a 90mm lens, the viewfinder “zooms” to fill the entire frame (not unlike a modern mirrorless camera).
None of this would be wholly persuasive to convince you to add it to your bag, but the lenses are what clinch the deal. Like most Contax lenses, G-mount glass was made by Carl Zeiss – and they are some of the company’s finest work. Ranging from a 16mm Hologon to a 90mm Sonnar, all of the lenses are optical works of art. In my opinion, the 90/2.8 Sonnar and 45/2 Planar stand out as the crown jewels, though I have heard the 16/8 Hologon is a true beauty (and also very expensive).
Zeiss Sonnar 90mm f/2.8 for Contax G
The 90 Sonnar can be found dirt-cheap (<$200) and is a must-have lens for any G1 or G2 owner. It also adapts easily to most mirrorless systems (Sony E, Fuji X, Micro 4/3, Nikon Z, maybe more) – though due to the lack of a focus ring on G lenses, focus must be controlled by a ring on the adapter. I actually didn’t mind this at all (I use a Fotodiox Pro and a Metabones – both great, with an edge to Metabones). The 28mm and wider lenses don’t perform as well on digital bodies, but the 45 and 90 lenses are excellent.
If you search for Contax G1 bodies, you may find some described as “green label.” These are updated versions with modified ROM and will have a literal green label inside where the film canister sits. The upgrade allows these bodies to use the 21 and 35mm lenses (regular G1’s can only use the 16, 28, 45, and 90 lenses). No G1 can use the 35-70 zoom.
Leica CL/Leitz Minolta CL/Minolta CLE
When it comes to rangefinders, the Leica CL (sometimes labeled Leitz Minolta CL) is one of the best deals on the market currently.
The CL was designed in concert with Minolta. Unlike many other M-mount rangefinders, the CL has framelines for 40mm lenses – along with 50 and 90mm. Leica and Minolta designed and released a Leica 40/2 Summicron (almost certainly a wholly Minolta design) that was bundled with the camera as well as a Leica Elmar-C 90/4.
Like the M5 that was released one year prior, the CL uses CdS meter on a pivoting arm in front of the shutter that drops down right before the moment of exposure. Because of this, certain lenses cannot be mounted without damaging the arm: those with excessively protruding rear elements (usually wide-angle) and collapsible lenses (which can be used if you don’t fully collapse them).
Seven years later, Minolta introduced the very similar Minolta CLE – one of the most advanced rangefinders of its time due to the presence of aperture-priority autoexposure (something Leica wouldn’t accomplish until the release of the M7 decades later).
Example of white spots and coating damage on an M-Rokkor 28/2.8. There was little effect on image quality, with the exception of excessive flare when directed toward a strong point source (and without a hood).
The CLE included framelines for 28, 40, and 90mm lenses – the former due to Minolta’s introduction of the M-Rokkor 28/2.8. They also released the M-Rokkor 40/2 and M-Rokkor 90/4 – these two being identical to the previous Leica versions, as far as I know. The M-Rokkor 28mm is notable for its development of white spots inside (which often don’t affect the image) and the middling durability of its coating. Nonetheless, all three lenses are exceptional optics.
……………..CONTINUED IN PART TWO
To Filter or Not: UV, ND, Polarizing, and Other
One of the longest running debates on the Internet is the use of filtration – specifically UV (ultraviolet) filters. Some see UV filters as instruments of protection (of their lens) without any real consequences; others see them as sacrilegious pieces of inferior glass that compromise image quality. So, let’s get into it a little bit because there are merits to both camps; though I feel like it is almost universally agreed that any filters that come in a camera or lens bundle should best be left unopened and away from your lenses.
Let’s be clear upfront: there will be no definitive answers here, nor any pixel-peeping sample photos of shots with and without filters. This is more about the types of filters and reasons to use them (or perhaps not). As with many of these posts, this is intended to be more informational/educational (with some opinions thrown in) than a simple “here’s the best and only way to do this.”
Finally, I’ll close with some recommendations of very good and excellent filters that I personally use.
One of the longest running debates on the Internet is the use of filtration – specifically UV (ultraviolet) filters. Some see UV filters as instruments of protection (of their lens) without any real consequences; others see them as sacrilegious pieces of inferior glass that compromise image quality. So, let’s get into it a little bit because there are merits to both camps; though I feel like it is almost universally agreed that any filters that come in a camera or lens bundle should best be left unopened and away from your lenses.
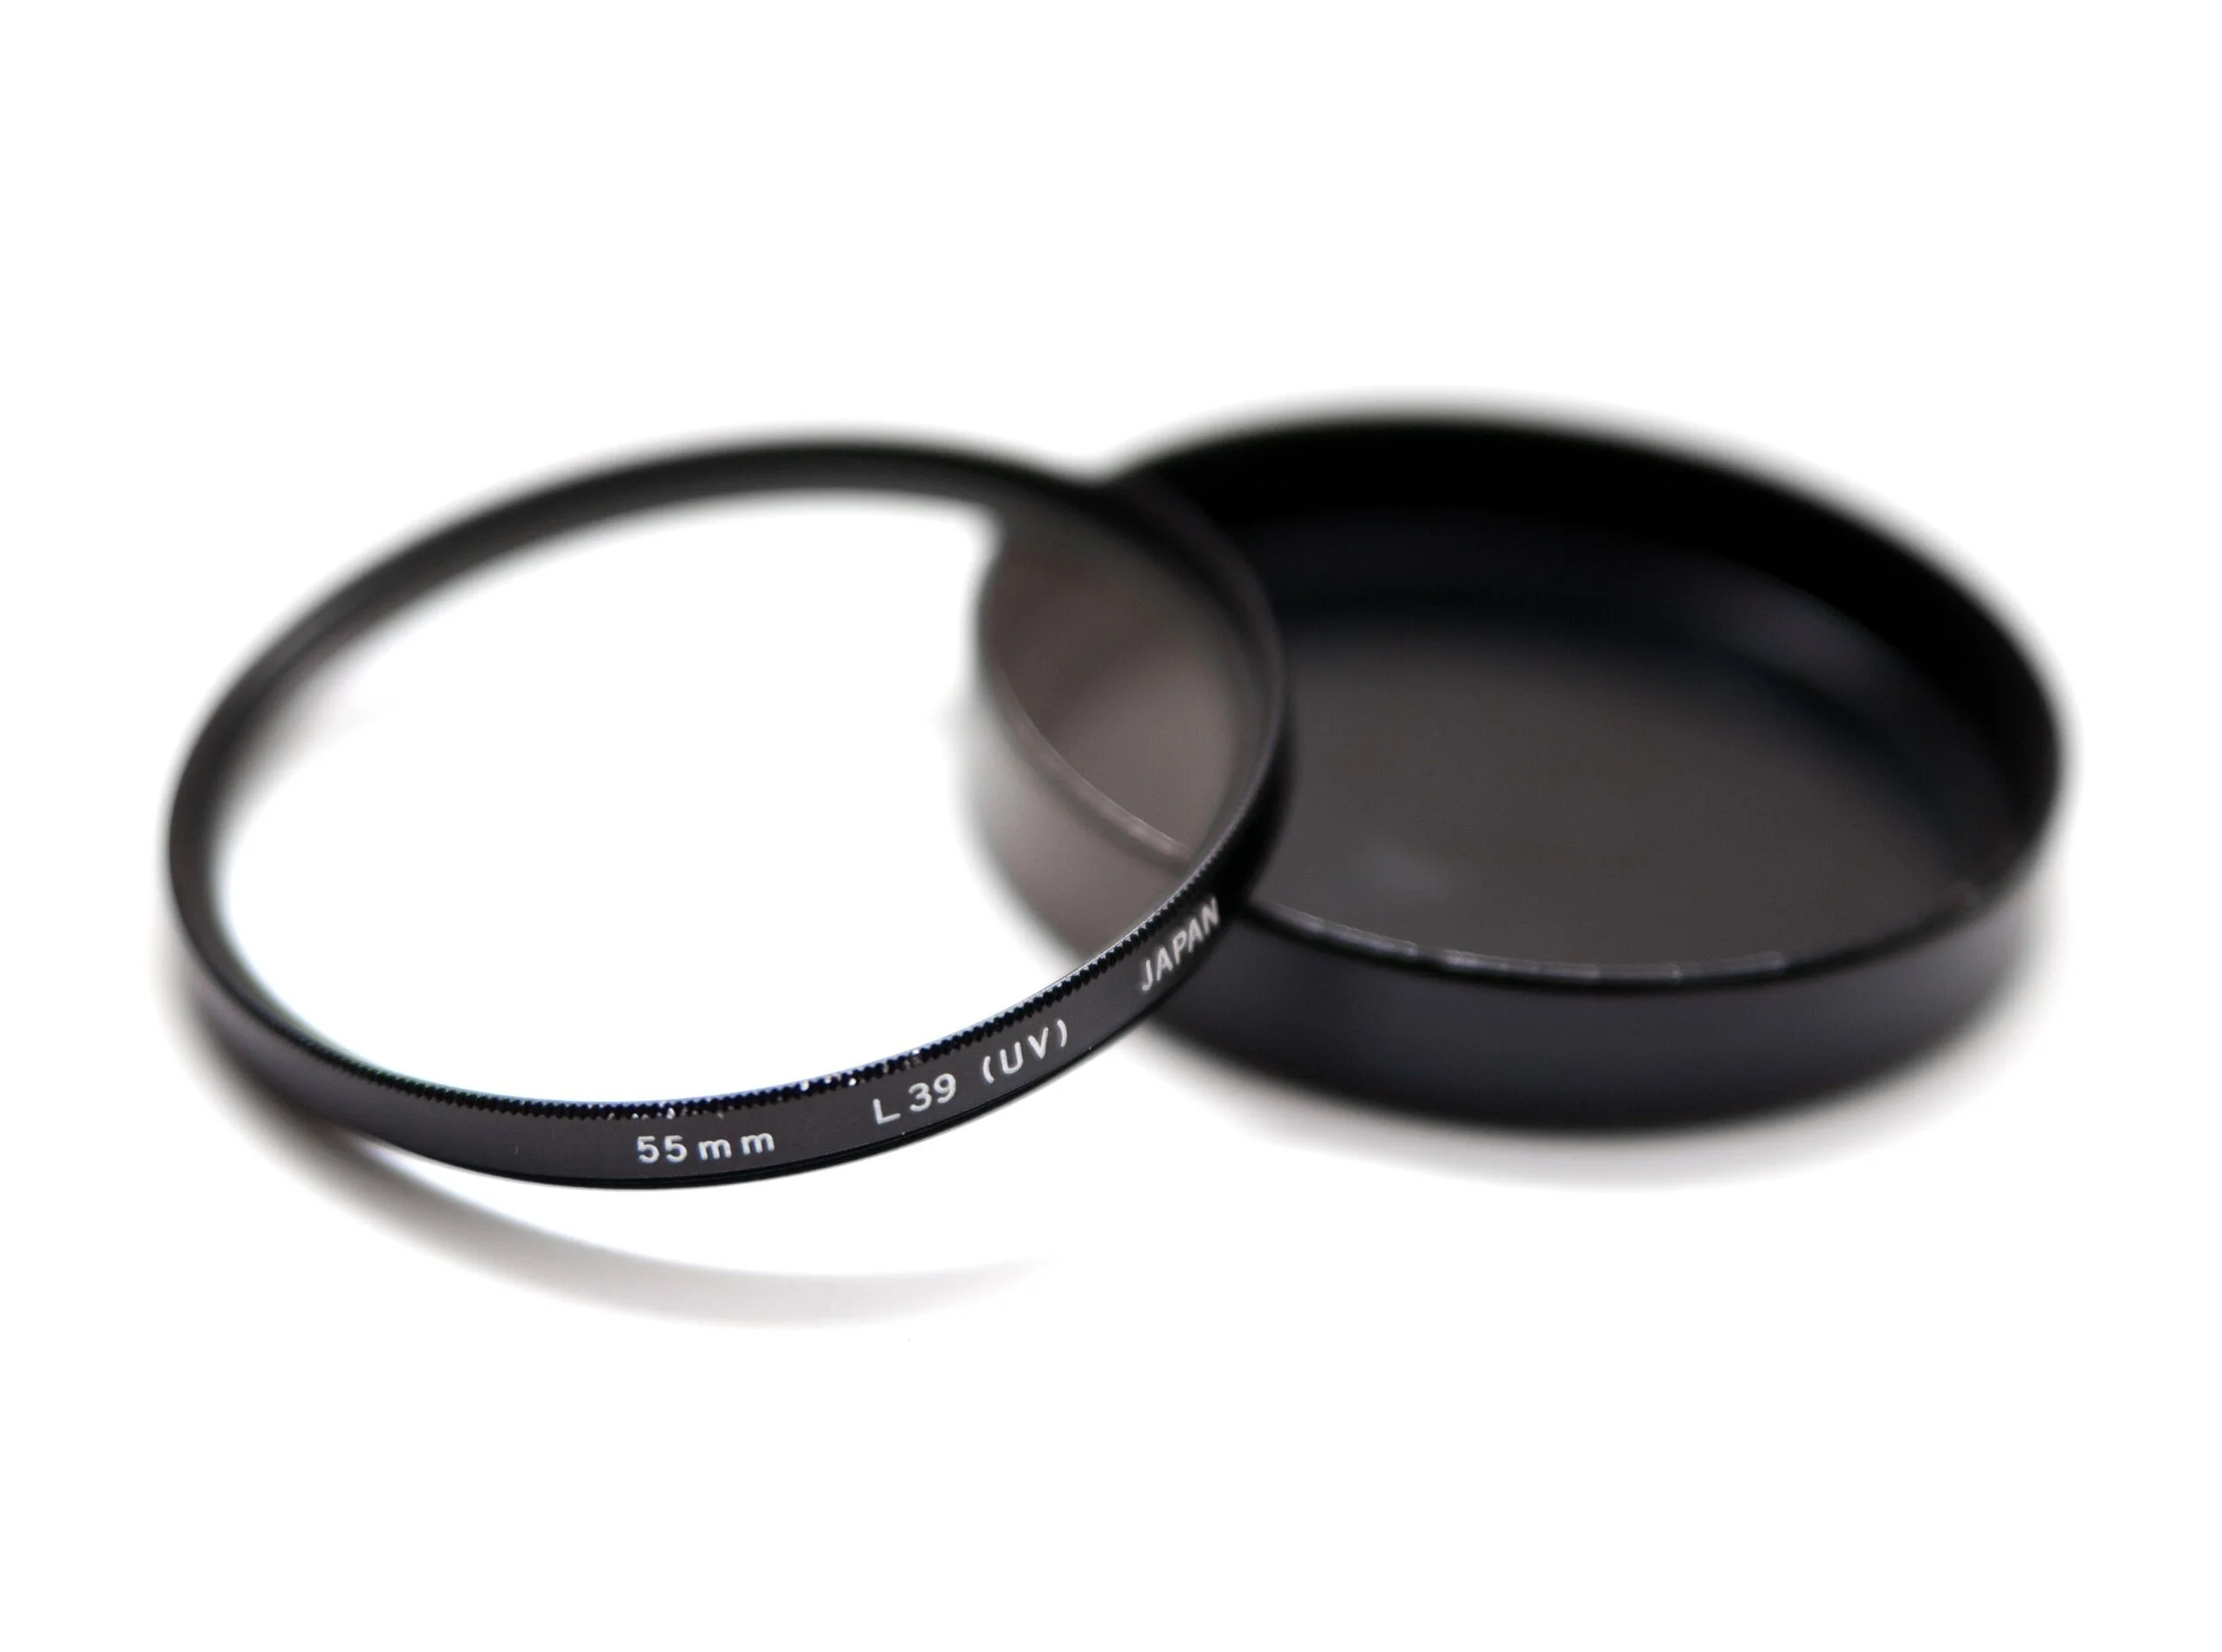
L39 UV Filter
Wikipedia Creative Commons License
What the hell is a UV filter? Good question. There’s a reason these filters aren’t just called “protection filters” or some such, even though that’s just about all they do (these days). First of all, we should denote the difference between a UV Filter and a UV Pass Filter because sometimes the former is used to describe the latter: a “UV filter” is nothing more than glass that filters/eliminates/blocks ultraviolet light from passing through into the lens and subsequently onto the sensor (or film). A “UV Pass Filter” is quite the opposite; it allows types of ultraviolet light through while blocking others. We’re talking specifically about UV Filters only.
Light presents itself in all manner of ways, many of which we cannot see. Ultraviolet light is one of those types that we cannot see – in fact, visible light is generally defined as landing somewhere between 400 and 700 nanometers. This happens to be the spectrum between ultraviolet (roughly 10-400 nm) and infrared (about 700nm up to something like 1400nm for near-infrared; other types have longer wavelengths). Below UV light we have x-rays, which can be as small as 0.01nm (aka 1 picometer), and gamma rays; above infrared we have microwaves and radio waves, among many others.
At any rate, there are many different types of light, but also many different types of ultraviolet light. So, in the olden days, film was particularly sensitive to ultraviolet light; most modern films fair just fine without filtration, though depending on the environment, color film can fall victim to hazing and overexposure in the blue layer (the blue layer is sensitive not only to blue light but also UV light). Most filters from the film days would filter out a specific threshold of light; an L39 UV filter (as seen above) was common among brands – its name indicating that it filtered out UV light below 390nm.
What about digital cameras? These days, many UV filters are nothing more than clear pieces of glass with some coatings – they don’t actually filter any light. Modern digital sensors now have UV (and IR) filtration in front of the sensor. This wasn’t always the case – many video cameras required the use of IR cut filters for a while, as did cameras like the Leica M8. Some people will actually have these filter stacks removed or replaced to allow their camera to capture a greater (or different) spectrum of light; I have a 720nm IR converted Sony a6000. Conversions can range from UV (to filter everything except ultraviolet light), 720nm IR (the most popular, as it makes for a nice balance of beautiful color photos as well as black and white), 590nm IR (best for color only), 850nm IR (best for b&w only), and even full-spectrum which allows the sensor to collect UV, visible, and IR light, though this type requires the use of lens-based filters to switch between whatever light you do/do not want to capture. Kolari Vision is famous for these modifications.
Long story short, unless you have an older digital camera that lacks filtration or you have a modified camera, a UV filter will not provide any image quality benefits. If you choose to use one, you’re using it as protection for your lens.
What are the downsides of filters? Well, there are many possible issues, with possibility nearing certainty if you use a cheap, poorly made filter. Issues can range from transmission loss (this is inevitable technically, but bad filters transmit even less), veiling flare, color cast, ghosting, decreased acuity, and/or vignetting. Many of these can become quickly apparent when used with wide angle lenses.
General Interference with optics. This can be due to a huge variety of reasons and the effects can manifest themselves in just as many different ways (some are described as you read on). But, to describe an example as simply as possible: consider a lens like the Nikkor AF-S 14-24/2.8G, or Tamron SP 15-30/2.8 G2, or Sigma 14/1.8; all of these are fast, wide-angle lenses with bulbous, convex front element. Now, think about putting a flat piece of glass over that (which you have to attach to lenses like these with a large 150mm square fixture due to that front element). It might change some things, right?* One of which is the way light hits and enters the front element (angle of incidence), of course altering the path of the light as it travels to the sensor in the process. In effect, you are changing the optical formula of the lens.
*Wide angle lenses are particularly susceptible to this – not just because of their large front elements and gargantuan filter holders, but also because they’re collecting light from such a huge field of view (and therefore from an absurd number of angles). This is precisely why a 14mm lens at f/2.8 only requires a pupil diameter of 5mm, whereas a 100mm lens at f/2.8 needs a 35.7mm pupil – they both gather the same amount of light, but the 100mm needs a much larger opening because it gathers light from a significantly smaller area.
Light loss. All glass has a certain level of transmittance* – light is reflected, scattered, and absorbed as it passes through glass. This is why we have both T-stops and F-stops and they are never the same, though the best lenses manage to get very close. Lens and filter manufacturers try to achieve transmission as near to 100% as possible through the use of specialized coatings and glass elements, but a true 100% transmission is purely theoretical.
*“Transmittance” and “transmission” are not the same. Transmission is the amount of light that passes through a material (glass in our case) – often expressed simply as a percentage. Transmittance is a measurement of the amount of light that the glass reflects, absorbs, or disperses. Ergo, transmittance is essentially the inverse of transmission; and thus, the higher the transmission, the lower the transmittance (and vice versa).
Ghosting. Filters can also cause light to bounce around internally in ways that it certainly isn’t meant to. For example, light entering the lens can bounce from the sensor, back off the rear of the filter, then once again back into camera – this can rear its head as ghosting due to the secondary “ghost” image it produces on the opposite side of the optical axis. This is particularly noticeable at night and/or wide open and can even happen without a filter attached at all if there are flaws in the lens’ optics. I learned the latter the hard way years ago when shooting a show with what was obviously a misaligned Sigma 18-35/1.8 – ghost images appeared in a handful of shots, many during the daytime and a few at night; some daytime shots had matte-box ND filters attached and night shots had no filtration at all yet still produced ghost images.
Acuity/Resolution Degradation. Any time you place a piece of glass in front of a lens, you run the risk of degrading the peak image quality (in this case, pixel acuity) that the lens is capable of achieving. This effect is more noticeable as you climb the ladder of sensor technology; what may appear to have no ill-effects on a 12MP sensor with an AA filter may well prove to be terrible on a 47MP AA-less camera. In the days of film, a decent filter would likely not noticeably degrade IQ – lenses weren’t as good, 35mm film resolved less detail than sensors of today, and grain would typically mask minor optical deficiencies. Plus, even UV filters actually had measurable benefits on film.
Color Cast/Vignetting. These are relatively simple to understand. There are a couple reasons a filter may introduce color cast:
1) If a filter is not spectrally neutral, it will have some sort of effect on the colors – fairly obvious.
2) Depending on the design of the lens and the filter being used, the optical formula of the lens may be compromised to the extent that you see the effects. Filters can imperil the telecentricity of the lens and therefore undermining its zero angle of incidence*; this in turn causes rays of light to strike the sensor at an angle non-parallel to the optical axis. The upshot of this is the potential for color crosstalk as the light interacts with the color-filter array.
*A lens with a zero angle of incident is purely a theoretical perfectly telecentric lens. I doubt any such lens truly exists. Lenses will have a non-zero angle of incidence by their nature, however this doesn’t change the aforementioned interactions.
3) When using an ND filter, there is a decreased amount of visible light passing into the lens, but infrared light is unaffected. Because of this, the ratio of infrared to visual light increases and can induce color casts.
A lot of side-by-side tests of filters – and this is certainly not exclusive to UV filters, in fact ND filters may be the worst offender here – will show how much a non-spectrally neutral filter can shift the color balance of the image. Obviously, this doesn’t pertain to filters whose intended purpose is to do that exactly that. Vignetting is less of an issue here as it is one of the least worrisome of optical deficiencies, at least in my opinion. However, we really don’t want a filter to introduce additional vignetting on top of what the lens inevitably already exhibits. This is mostly an issue with wider angle lenses and/or thick filters. My suggestion is to always get the thinnest filter – Formatt Hitech, for example, calls these “Superslim.” Step up rings to use a larger size filter than your lens thread size is another option – this also allows you to buy fewer filters but still use them across multiple lenses.
So should you use a UV filter? I don’t know. Up to you. Personally, I use them some of the time and not at all most of the time. I certainly don’t use them in any type of controlled environment such as product, portraiture, etc. I will use them in more volatile environments – dusty, sandy, otherwise dirty, anything where there’s a good chance of abrasive particles/materials hitting the front element. I’ve shot in machine shops where small pieces of wood/metal/sparks are flying everywhere and I’ll definitely have one on in that situation. As for general protection? Meh. The front element of a lens is much more durable than most people think and modern repellent coatings are quite good at making minor dust, rain, snow, etc. easy to clean. I find that a lens hood and of course the cap are more than enough to protect from accidental bumps or dings.
Filters other than UV. Okay, so let’s hop in to the other types of filters – at least a few of them. There are tons of types of filters (and subvariants within those types) and I won’t cover them all. Pretty much every downside covered above is equally applicable to non-UV filters, though some of those effects (e.g. light loss in the case of neutral density filters) are the very purpose of the filter. So, the big ones:
Neutral Density (ND) Filters
These are filters that cut the amount of light that enters the lens by an order of a specific magnitude – an ND 1.8 (aka ND64) filter cuts light by six stops, for example. Ideally, these filters do this with a neutral transmission, meaning they cut the amount of light but do not affect the color, tint, white balance, etc. In practice, this is often not the case, especially with cheaper filters. A bit of a color cast can be dealt with and is not the end of the world in most cases, as long as the cast is uniform across the frame, which it ought to be with a standard ND filter.
Water smoothing effect of a lower shutter speed
Wikimedia Commons
These filters are usually used to lower the exposure enough to shoot at a wider aperture in bright light or to shoot at very slow shutter speeds. An ND64 (six stops) filter is the difference between a 1/60th second exposure and a 1 second exposure; or the difference between 1 second and 1 minute. In the latter, you may get a small amount of motion blur from that one second exposure, but a full minute will give you a lot more. Photos of waterfalls or ocean waves that have a smooth, silky appearance are examples of long exposure photography likely taken with an ND filter. Without the filter, these photos would have been grossly overexposed.
There are also variable ND filters, where the “darkness” of the filter changes as you turn the filter ring, and graduated ND filters, where the filter fades with a gradient from lighter to dark (usually used to darken a sky while not affecting the lower portion of the image). Uniformity becomes a potentially more serious issue with variable ND filters – these use two polarizing elements to allow you to vary the density by turning the filter. Again, due to the high number of glass elements, a poor quality variable ND will probably have some significant negative impact. With filters you really do often get what you pay for.
Colored Filters (Red, Yellow, Orange, Blue, Green of varying intensities)
These are almost never used today; most digital sensors have made them irrelevant. Colored filters were typically used in the film era with black and white photography.* A red filter darkens skies and creates a more gritty aesthetic; yellow darkens blues to separate the sky from the clouds and renders pleasing skin-tones; orange sits in the middle of those two, of course; blue lightens skies and darkens skin tones; and green filters were often used for landscapes or anything with a lot of foliage – they would lighten the surrounding-greens to give a more natural feel.
*Colored filters (in the broadest definition of that term) were not limited to black and white photography. 80 and 82 series filters were often used to warm an image, particularly if you needed to tone down the blue of a daylight film (keep in mind, most photographic film was balanced for daylight, but cinema film had either daylight or tungsten options). 81 and 85 series filters would cool the image – used to tone down the effects of tungsten lighting, or the golden tones at sunset, or any number of other situations. With digital, well, we have white balance in camera and in post. Warming and cooling filters are also used by cinematographers to correct tungsten-balanced film (cinema film comes in tungsten and daylight flavors) in daylight or vice versa, as some directors/cinematographers like the look of a tungsten film with an 85 filter during daylight, for example.
The lone exception here are monochrome sensors. With Bayer – or X-Trans or Foveon – we have the wonderful advantage of channel mixers; basically, we have the ability to use a multitude of colored filters and precisely control their effect/strength. Monochrome sensors, naturally, lack that ability – they’re no different than b&w film in this way. So, if you have a Leica Monochrom, you may be well-served by investing in some colored filters, though you still will never have the latitude of a channel mixer from a CFA – filters are global and channel mixing allows for precise local adjustments.
Polarizing Filters
There are two types of polarizing filters – linear and circular – but we’re just concerned with circular polarizers, often abbreviated CPL. Linear polarizers wreak havoc on the autofocus and metering systems of DSLRs and don’t play nicely with AA filters, among other issues.

Polarizing filters are also helpful for landscapes (before/after)
Image by David Joyce, Creative Commons License
A CPL is a comprised of a linear polarization element plus a waveplate – the former polarizes the selected light linearly and the waveplate converts this into circularly polarized light. The effect changes as you rotate the filter and is most often used to cut the polarized light from skies, which enhances contrast, and to remove or reduce unwanted reflections off water, glass, or other reflective substances. The CPL must be adjusted appropriately for every scene and angle – what most effectively reduces reflections from one point of view likely will not with another.
The biggest disadvantage of (most) CPLs is that, due to their design, you cannot easily stack other filters on top of them – if you need to combine, say, an ND and CPL, the CPL might need to be attached last. It also makes the use of a variable ND more difficult, if not impossible, because of this; both filters must be rotated to achieve the proper setting. I try to avoid variable NDs in general (except for video work), because they can have poor cross-frame consistency issues, especially at the extreme end.
Along with ND filters, CPLs are probably the most valuable and useful filters you can get – though naturally it depends on the type of photography you do. CPLs would hardly be of use for in-studio fashion photography. But if you do any landscape or nature photography especially, I’d highly recommend investing in one; better to spend a lot of money on a high-quality filter at the largest size you need and use step-down rings than multiple cheap filters.
Other Filter Types
There are dozens upon dozens of filters that do all manner of things, some of them nothing more than toy effects. But here’s a quick rundown of the most commonly useful filters:
Diffusion: These are filters typically used to soften the sometimes harsh and biting resolution of digital photography, or more commonly, cinema. They can be useful for portraiture, though you can usually accomplish similar effects with more control in post. Video is the main use for diffusion filters.
IR (Infrared): These are used with modified full-spectrum sensors to block visible light (usually up to around 720nm) for infrared photography. With full-spectrum sensors, you must use various filters to block out the unwanted light. There are also IR cut filters (mentioned above).
Light Pollution: These have a number of names - my Haida Nanopro is called “Clear-Night”, NiSi calls theirs “Natural Light,” Schneider has “True Cut” - but all of them are designed with the same purpose: to block the light emitted by sodium vapor lamps, which we commonly know as basic street lights. These filters have a strong magenta/pinkish color cast, but work wonderful for astrophotography if you are anywhere near a city. I have only used the Haida square Clear Night filters, which are excellent.
Brands I Like (Please Use Sidebar Links!)
B + W
Breakthrough Photography
Formatt Hitech Firecrest
Gobe (budget option)
Haida
Heliopan
Zeiss
Ishimoto Blog:
Integer posuere erat a ante venenatis dapibus posuere velit aliquet. Fusce dapibus, tellus ac cursus commodo, tortor mauris condimentum nibh, ut fermentum massa justo sit amet risus.